*** NOTE: ALL INFORMATION IS ACCURATE AT DATE OF PUBLISHING ***
NOTE: Although you could still use this method, be aware that the Email Bounce CXP Action was at one point no longer firing (you can see information regarding this in the comments. However, it was then ‘resolved’ by Microsoft and started firing again. So just be aware things can change. You may also be interested in this approach from Amey Holden.
If you are managing your organisations D365 Marketing activities, I am SURE you are well aware of the email policies Microsoft have in place in terms of the percentage of hard bounces, spam reports and direct complaints they will ‘allow’ before you start getting warnings and then even potentially getting your account suspended. Those are not places anyone wants to be! To help people combat email bounces and keep their data clean, I wrote about managing email bounces in D365 Marketing but this only would work for Outbound Marketing emails and journeys. Real-time Marketing is the place to be now, but there still isn’t an easy way to review Hard and Soft Bounces, and even less easy is a way to make sure the right people are reviewing records to make sure the right Contacts are actually available to continue sending emails to. In this post I will look at a process you can build to help make sure your Hard and (some) Soft Bounces are documented and actioned accordingly.
D365 Configuration Changes
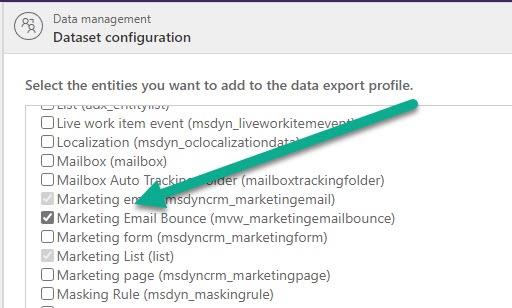
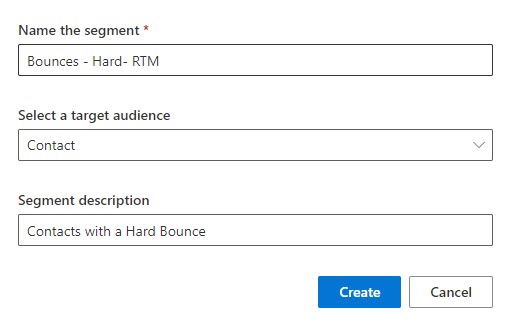
First thing we need to do is have a clean way for someone to review when there is a bounce, and also indicate they have actually done something about it (made the Contact Inactive, changed the Bulk Email field, fixed a typo in their email etc.). I’ve added a simple table but made sure it has the type of Activity.

Make sure you go into the advanced options and turn on track changes. This will then allow you to include it in the Marketing App as an entity to use in segments and other areas as needed.

I have only added one additional field to the table called Bounce Type as a yes/no field. I have No set as Soft, and Yes set as Hard. You could use a choice field if you wanted also, but as I only had two options, this felt like a good fit. I then adjusted the Status Reason field and changed the Open value to Needs Reviewing and the Completed value as Resolved. Not needed, but the wording fits better for this scenario.
Next, from the Marketing App, navigate to Dataset configuration in the Settings area and find your new table in the list. If it’s not there, you likely didn’t set the track changes field. Select the table and then save the changes. You are done with configuration changes, easy.
NOTE: Although you could still use this method, be aware that the Email Bounce CXP Action was at one point no longer firing (you can see information regarding this in the comments. However, it was then ‘resolved’ by Microsoft and started firing again. So just be aware things can change. You may also be interested in this approach from Amey Holden.
Email Bounce Flow in Power Automate
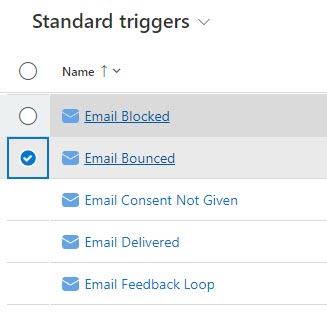
A flow will be used to create the new Marketing Email Bounce activities. It’s important to note, the standard triggers below are essentially all actions that are performed when each thing occurs. So although currently nothing is added to a Contact record when an email bounces, there is actually an action that completes. We can leverage that to start our flow.
It would also be a good idea to go back and read my previous article on managing email bounces that I did for Outbound Marketing where I discuss the various email bounce categories and what to consider as a bounce you should be really paying attention to. You can find the full list of categories from Microsoft here.
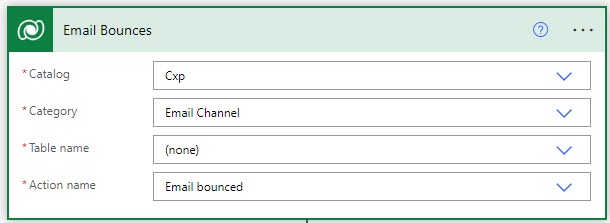
So the trigger of the flow is ‘When an action is perfomed’ from the Dataverse connector. The Catalog is CXP (stands for Customer Experience), the category is Email Channel, table is none, and action name is Email bounced.
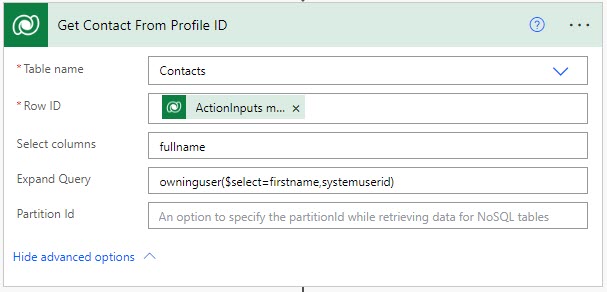
Next the ‘Get a row by ID’ step will let us find the Contact that is linked to this Email Bounce action. The action passes back a ton of action inputs, one of them being the msdynmkt_profileid, which is the Contact in this case (unless you are doing Leads, then it would be a Lead). We use that value in the row id to get the person from the Contacts table. I don’t want much else, so rather than pulling back the entire thing, I am going with the fullname field from the Contact by adding it to the Select columns. I then want to get the firstname and systemuserid from the Contacts Owning User. We can do this be adding information in to the Expand Query field.
owninguser($select=firstname,systemuserid)
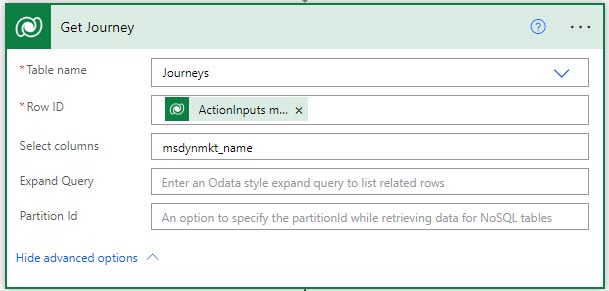
Next, we will get the Journey. Again, I only want the name of the Journey, so using the ‘Get a row by ID’ step and looking in the Journeys table, I can use the msdynmkt_journeyid from the Action Inputs, and just pull back the msdynmkt_name field from the Journey that the Email Bounce is linked to.
NOTE: Although you could still use this method, be aware that the Email Bounce CXP Action was at one point no longer firing (you can see information regarding this in the comments. However, it was then ‘resolved’ by Microsoft and started firing again. So just be aware things can change. You may also be interested in this approach from Amey Holden.
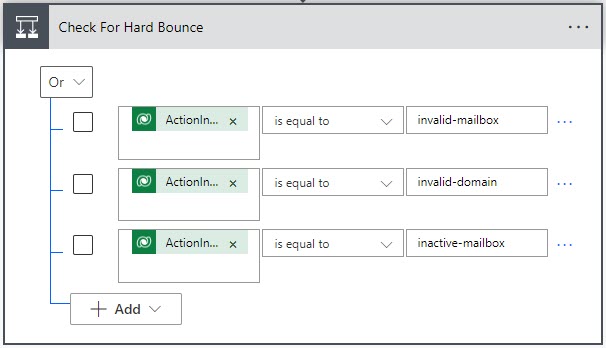
The next step I have used is a Condition. This is where you really need to consider your own requirements. You might want to only have notifications for hard bounces, or just have one for any of them, but for this example I am splitting out the following email bounce categories and considering them all hard bounces that should be reviewed. We have invalid mailbox, invalid domain and inactive mailbox. Technically inactive mailbox isn’t a hard bounce, but it’s rare that this would resolve itself so you really shouldn’t be emailing them anymore. The condition used is the msdynmkt_category value from the Action Inputs. The condition uses Or logic, and I have named the categories exactly as they are listed in the documentation from Microsoft.
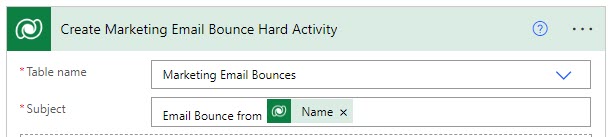
For the Yes branch (meaning the category of the Email Bounce matches one of the three above), we will create a new Marketing Email Bounce activity. We can set the subject as anything, but I am using the Name field from the Journey we retrieved so it’s clear where this came from.
I am then setting the Bounce Type as Yes which correlates to Hard in my Bounce Type field. You can then put whatever description you would like, but I am pulling in the name of the Journey again, along with the name of the Contact. I am then indicating it was a hard bounce and then showing the category. The msdynmkt_details is useful to add in for additional information because it contains a bit more for some of the categories that could be helpful. For the Owner, I am assigning it to the owner of the Contact, and setting the Priority as High. I want to set a Due Date on the activity and make sure it’s done within 2 days of the bounce occurring. For that, you can use an expression of addDays from now, and then set the number of days, then the format of the date.
addDays(utcNow(),2,'yyyy-MM-dd')

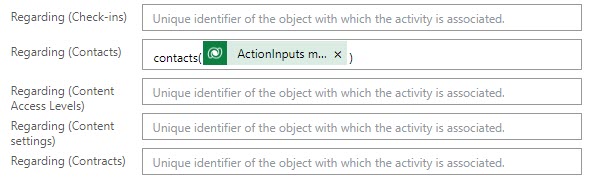
The last thing in this step is to set the activity regarding the Contact. This can be done again using the msdynmkt_profileid and setting it in the Regarding (Contacts) field with it enclosed like you see below.
Now for the No path which is about the Soft Bounces. There are four that I consider should be reviewed, but that’s up to you to decide which ones you want to focus on. I don’t for example care that someones mailbox is full, because it could be resolved by the next time we send them an email. What I do think is important are the following.
- blocklisting-issues
- policy-related
- reputation-issues
- dmarc-issues
For this Condition (that goes at the top of the No path) we have an Or logic to check if the category is any of those above. Note that I am going off the wording on the Microsoft documentation but obviously not able to test these out. You could just set it to start creating these then add your conditions in at a later point once you start to see the kind of bounces you are getting. If the condition is met, do the same thing as before and create a new Marketing Email Bounce activity. You can then adjust the description, set the Bounce Type to Soft, and even change the priority and due date to be lower than that for a Hard Bounce. It’s your choice.

Creating Segments For Real-time Marketing Bounces
In order to make the most from the new Marketing Email Bounce activities, we can use them in the building of some segments. You can combine them if you like, or do one for Hard Bounces and one for Soft Bounces.
NOTE: Although you could still use this method, be aware that the Email Bounce CXP Action was at one point no longer firing (you can see information regarding this in the comments. However, it was then ‘resolved’ by Microsoft and started firing again. So just be aware things can change. You may also be interested in this approach from Amey Holden.
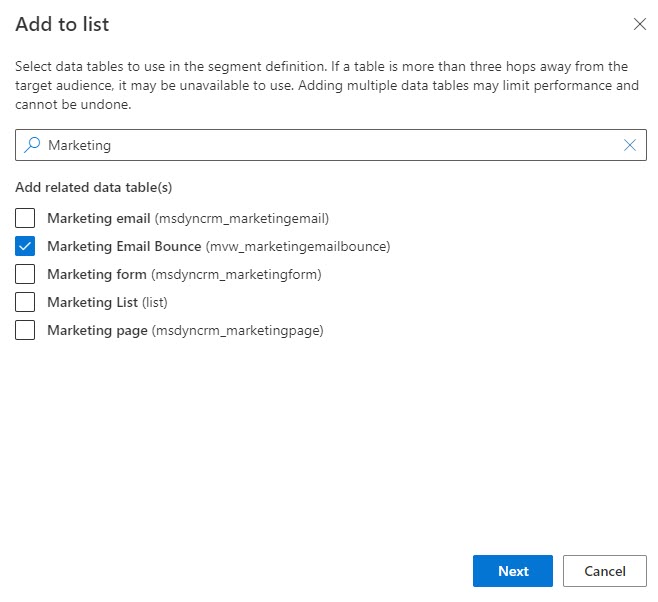
The first time you build a segment and need to use the new table, it needs to be added to the list of related tables. Click the Add table option.
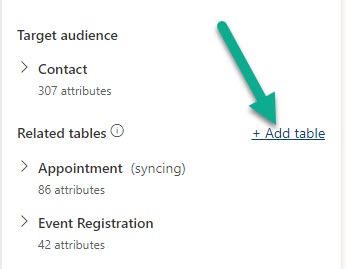
Find the table then select it and click Next to add it to the list of available related tables.
After you’ve added it, the table will show that it is syncing. Although you can start building your query, you won’t be able to see any results for a few hours. It seems to take a while before it’s all completely synced through, so just keep that in mind.

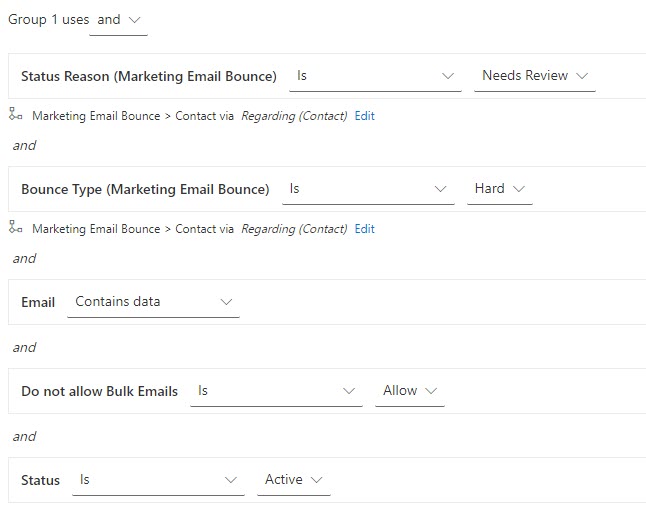
When you are ready, you can then build the query. Add in the Status Reason from the Marketing Email Bounce table with a link to the Contact via the Regarding Contact field. Do the same with the Bounce Type field. In this query I only want Contacts that have one of those activities and the Status Reason is Needs Review, and when the Bounce Type is Hard. The other fields in the query are all pulling directly from the Contact and are showing people that are Active, where their email address contains data, and where the Bulk Email field is set to Allow. Those last three fields, I suggest always including an ANY of your segments for cleaner lists.
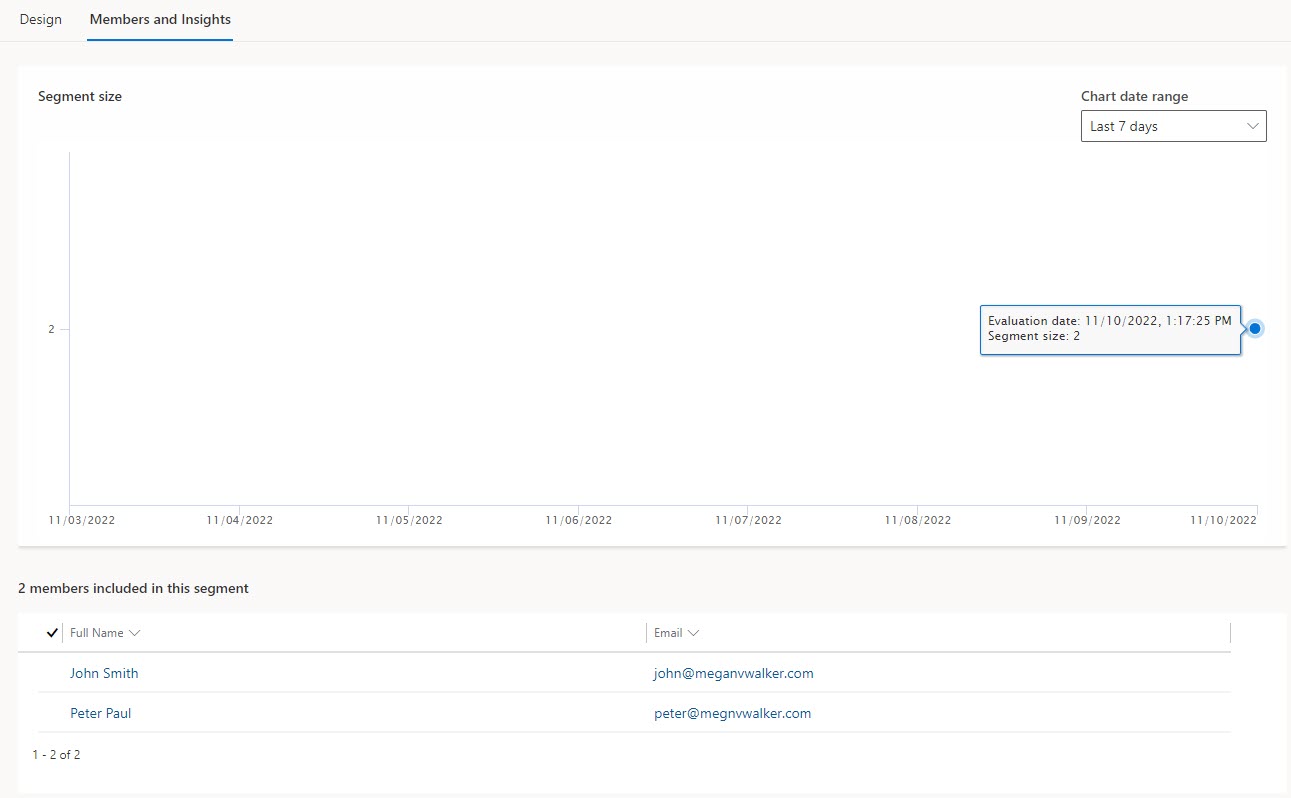
Once the segment is ready, you can make it live and ready to use. Here we can see there are two Contacts who have fallen into the segment that have a Marketing Email Bounce activity that needs reviewing. Now make a second segment exactly the same but where the Bounce Type is Soft.
Reviewing The Activities
When a Journey is sent out, and if there is an Email Bounce action triggered, this will run the flow in Power Automate and generate an activity. Here we can see an activity with the Bounce Type of Hard was generated for Peter Paul. This was due to an inactive-mailbox. It’s been set with a High Priority with a Due Date in a couple of days. It’s also been assigned to the Owner of the Contact to review.
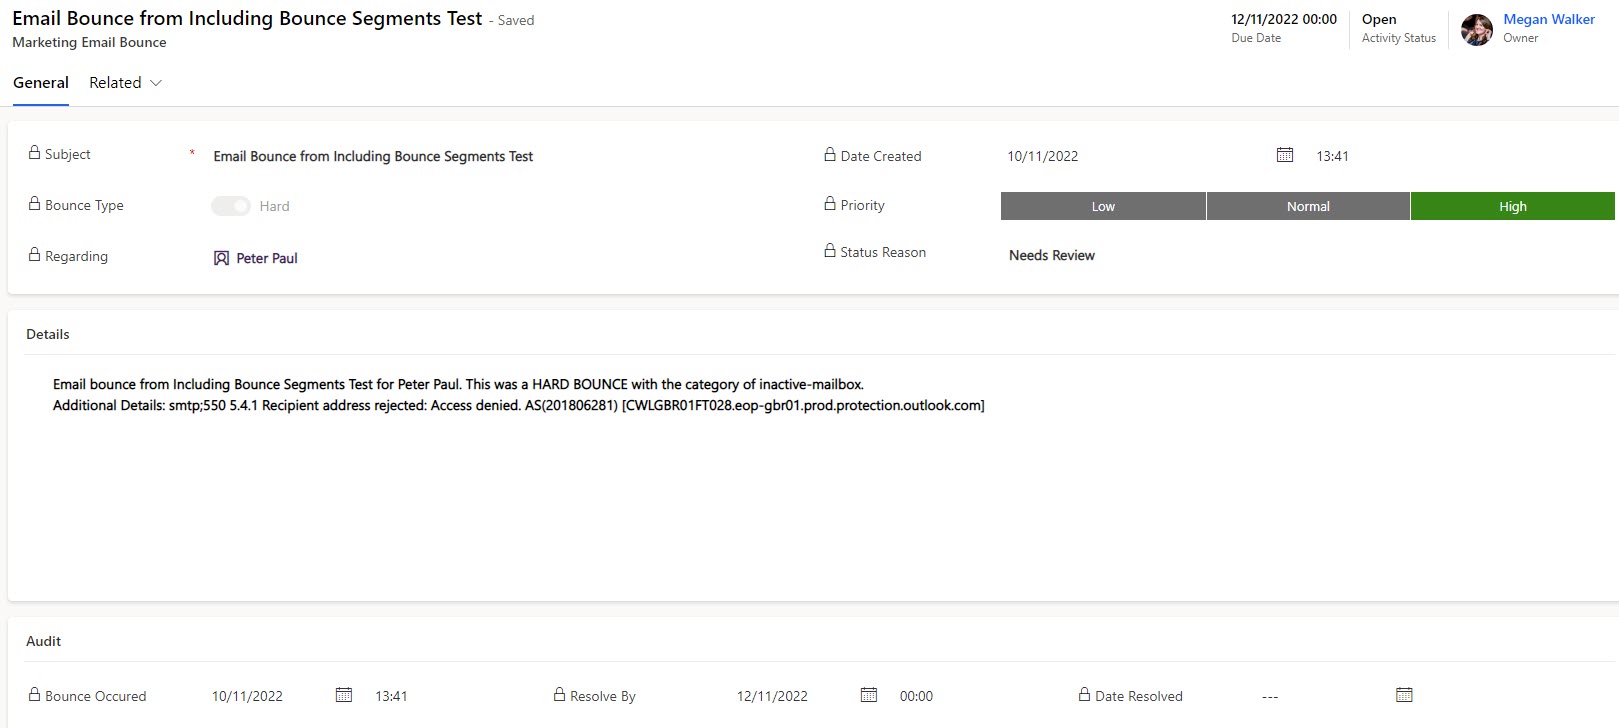
The Owner can now review the details, and then decide what to do. If it’s a Customer, this is really important to make sure messages are getting through to them, especially if the emails are about a service or their account in general. Sometimes picking up the phone is the easiest thing to do. Maybe their organisation had issues with email company wide? Or perhaps you will find out they have actually left the company. Whatever the approach, someone should review and take action. Some suggestions might be:
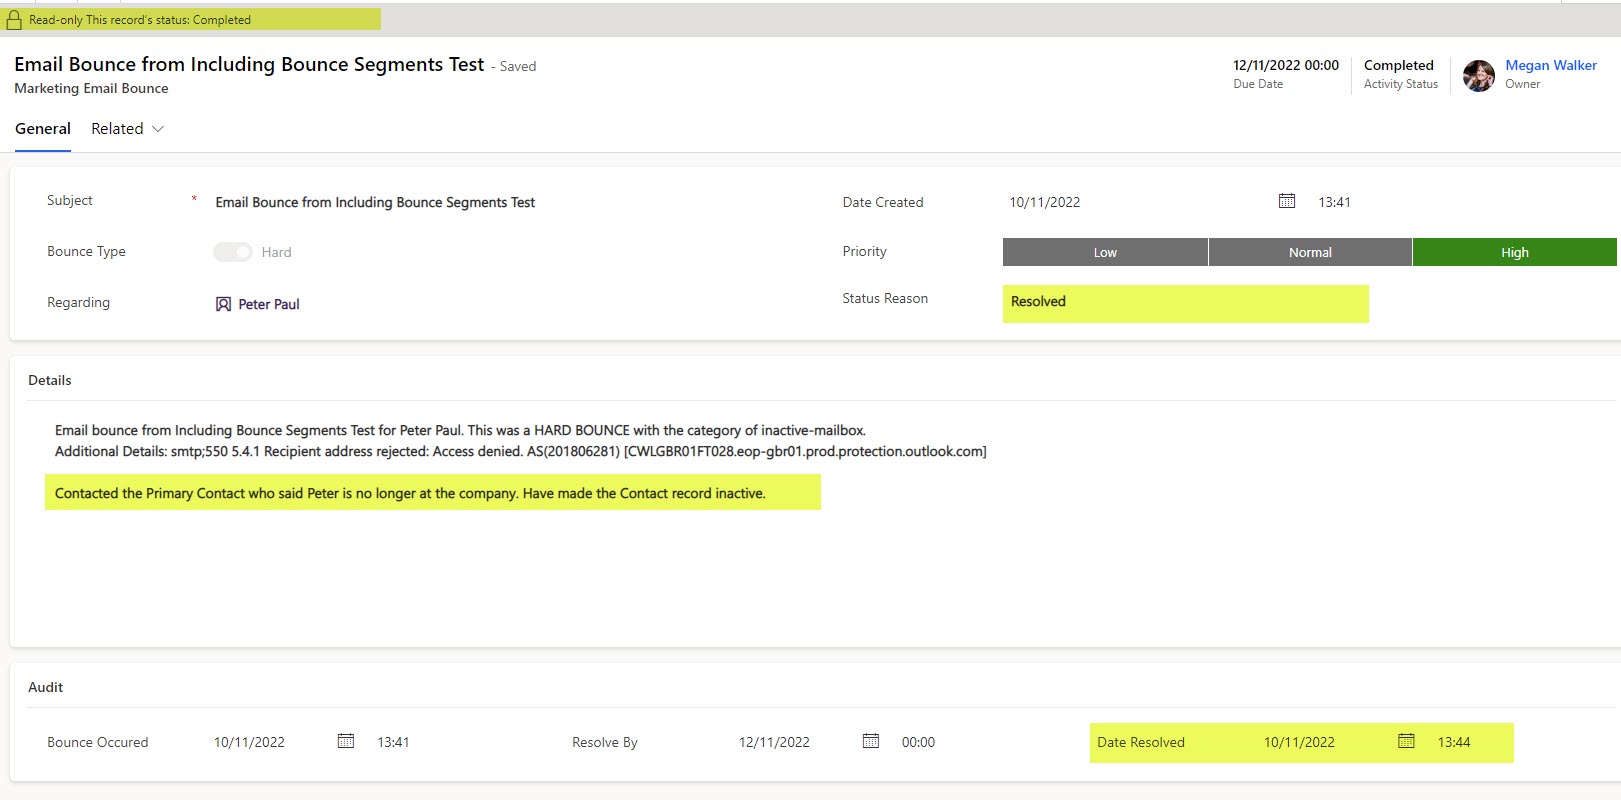
- Make the Contact Inactive if they are no longer working for the Account
- Change their Bulk Email field to Do Not Allow
- Review their email address and make sure there aren’t any typos
Once the record has been reviewed, the owner of the Contact can then add information in the Marketing Email Bounce activity then mark it as Complete. This will make it read only, update the date resolved (actual end date), and change the Status Reason to Resolved. Nice and neat and tidy with a trail to show what happened and who took action.
Using The Segments In Journeys
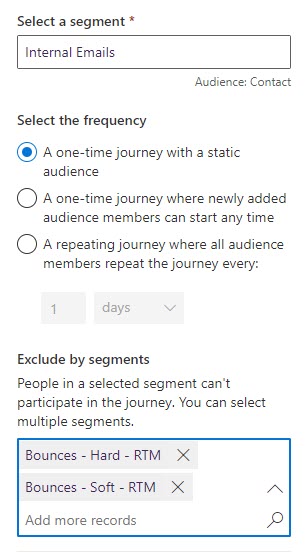
You can use the same logic in the Bounce Segments created above and include it in all of your other Segments. Or you can use the Bounce Segments in your Real-time Marketing Journeys to exclude people from going through Journeys. You can do this by creating your Journey, then clicking on the Journey Settings on the right and then in to the Start criteria by clicking Edit. This is where it shows you the segment or trigger being used, but then also gives you a field for ‘Exclude by segments’. You can add multiple segments, so just adding the two bounce segments for Hard and Soft bounces will make sure anyone in those two lists will be excluded from your Journey. Simple!
NOTE: Although you could still use this method, be aware that the Email Bounce CXP Action was at one point no longer firing (you can see information regarding this in the comments. However, it was then ‘resolved’ by Microsoft and started firing again. So just be aware things can change. You may also be interested in this approach from Amey Holden.
Check out the latest post:
Use Custom Event Registration Questions To Branch Your Journeys In Customer Insights
This is just 1 of 603 articles. You can browse through all of them by going to the main blog page, or navigate through different categories to find more content you are interested in. You can also subscribe and get new blog posts emailed to you directly.
Hi Megan,
Thank you for this great blog.
I’m trying to build this power automate flow, but I’m already out on the first step. Well actually before, its the trigger i can’t set.
When i choose CXP as Catalog and email channel as categori there’s no actions, and no tables. Do you have any idea why it is so..?
I’ve been a D365 marketing customer for 8 months now, and we have experienced a lot of challenges setting up data to work as expected. example: changing Contact data created before installation so that the statistics work in RM(havent seen anybody mentioning this anywhere).
Hi Lars, correct, there should be no tables. Did you pick (none) from the drop down? You have to do that first and THEN you should see the list of actions in the Action name drop down.
Hi Megan,
I’m getting an error on the second step: Get Contact From Profile ID, I added everything just like you did, but it’s failing with the below error:
‘)’ or ‘,’ expected at position 25 in ‘(bypass_tracking_c60f1856-c7af-449c-ab28-463a2d9375f2)’.
Any idea how to resolve it?
Thanks
Hi Adrienn, I am not sure without seeing a screenshot of that step in your flow to see what could be missing. Feel free to submit through my Contact page and I will reply then you can send me a screenshot.
Hi Megan,
Thank you for sharing your vision on how to handle the boucnes in RTM.
Do you know if we add this same procedure (transfer bounces to an activity) to the “Outbound” bounces?
So this way we can track the actions taken on bounces and made the visual in the time line
Best Marco
Hi Marco! I am going to update this post, as now you no longer need to take the approach of adding activities. The ability to segment based on behaviours (bounces included) has been released for Real-time Marketing: https://learn.microsoft.com/en-us/dynamics365/marketing/whats-new-marketing#general-availability
I had previously written about handling with Outbound Marketing which you can find here: https://meganvwalker.com/managing-email-bounces-in-d365-marketing/
Hope that helps!
Hi Megan,
Its great that collecting the bounces is now GA. (in my region / my customers environment this is not yet availibe)
Your approach of using activities to proces and to store the actions based on the bounce are great. I hope you can make an additional blog on how to do this on OBM as well 🙂
Have great weekend.
Best Marco
Hi Marko, I won’t be writing one about activities and OBM, sorry. The only reason I did it for RTM previously is because there was no way to build it in to a Segment. Now that it can be done, I will be redirecting people to take a different approach to this one with an activity. You would need to make sure you are on the latest version of the Marketing App to see all of the new features from May.
Hi Megan!
I am trying to implement this, and i am having issue with the flow, which never triggers. I can share some screenshots, but i am not able to upload it here. Is there any way to get in contact with you?
Hi Tim. Sometimes the trigger needs to be removed and re-added to get it working. I have experienced this before in the past. You can always message me through my Contact page on the site. Once I get your email I will reply then you can share your screenshots if that helps.
Hi Megan,
Thank you so much for all these articles, really interesting.
you mentioned above in one of the recent comments that there is no longer need for creating the activity flow process as you did in this article, since it’s now available through behaviour segmentation in RTM.
can you please elaborate more on this? what I’m trying to do now for one of the project is to create a type of task for the account managers when any email gets bounce, so they can call the client and fix the email address.
Do you think there is another solution for this apart from the workflow you already talked about. Noting that I followed each step you did but unfortunately the workflow is not being triggered when emails are bounces.
Hi Serge, I have been looking at ways to still create a view of the members of the segment to edit. Hopefully will have time to review and do a new blog post in the next week or so.
2 questions.
Now that you can build bounce into a RTM segment, are you also able to make a list/advanced find with the members of the segment to edit for example. I can now find the RTM segments in the advanced find query.
If we are to build a similar solution as described here using the trigger to set a field on contact or create a bounce activity, do you have to use the trigger as an end to all journeys, or is the EMail bounced trigger triggered in every RTM journey automatically?
Hi Charlotte, I have been looking at ways to still create a view of the members of the segment to edit. Hopefully will have time to review and do a new blog post in the next week or so. If you kept sending Contacts through a Journey and they had already bounced once, in theory that should trigger each time you tried to send them an email.
I think another way around this now, since this way isn’t possible anymore, is to create a dynamic segment that pulls in bounced contacts. From there, you can create a real-time journey to create a task for contact owners. Do you think that would work?
It might! You would need to set the Journey so that someone could be run through it as many times as needed so each time there was a bounce it created a task. Would also need some logic so that people would fall back OUT of the segment once the task is complete. I will test it out!
Hello All,
there is a good chance, that this feature will be supported in Dynamics Customer Insights – Journeys very soon again. This I have been told by the Microsoft Support today, as I am experiencing the same issue with several of my customers.
Best, Johannes
Yes, it will! Very soon can of course change and be extended out in Microsoft’s roadmap unfortunately. Hoping this comes by the end of the year! Fingers crossed.
Hi Megan,
Im currently trying to set up a dynamic segment based on if a contact have had a hard or soft bounce in the last 28th days, and with some other criterias as well. I will be sending an SMS to these contacts, and do you know if there is a good why now to handle bounces in real-time marketing? Because I want to make sure that they will be updated in the system, to not have a hard bounce email once they update the email..
Hi Charlotte, there isn’t a good way as things like this are handled by the SMS provider you are using. Currently there is nothing sent back in to D365 when someone OPTS OUT of your texts, it’s just sent back to Twilio or TeleSign or whomever you are using. Also, you mention hard bounces which are email related not SMS.
Hi again Megan,
I back to see if there has been any updates on how to handle or follow up on hard/soft bounces in real-time marketing?
Regarding your previous answer, I want to create a journey with a segment with people who have bounced, and follow up with an sms saying they have bounced (This I already have set up, and is ok), I dont have any questions regarding this, but how will I be able to set up the journey and segment based on the contacts that has bounced, and if they change their email address, or dont have bounced anymore go out of the journey? Kind like a bounce follow, make sure people update their email if its not correct or old.
Hi Charlotte, if you haven’t already seen it, I would check out this post from Amey Holden, that might be of interest: https://www.ameyholden.com/articles/email-bounce-lead-contact-view-form-dynamics-365-customer-insights-journeys
So the CxP action works again as of my test today it is just that you need to select category “Email Channel Journey Start”. then you can find “Email bounced” is there a way to filter for “hard bounce” as bounce type eq vs. the custom conditions or any issues?
Hi Gus, I don’t know! As you say, it’s just working again for you as of when you posted the comment. If I have time to review I will try and do that at some point over the next few weeks. For now, I am unable to advise.