*** NOTE: ALL INFORMATION IS ACCURATE AT DATE OF PUBLISHING ***
If you are sending out D365 Customer Voice survey requests via D365 Marketing (like I showed in this blog here), you might have noticed that all of the responses in D365 Customer Voice show as Marketing respondent, with no name linked to them. Opening up a response shows the First Name and Last Name as generic values. Although the response activity record in D365 will be linked to the correct Contact, it also means that any alerts generated will also be linked to a generic name, making it pretty much impossible for a user in D365 Customer Voice to know who to assign that alert out to so it can be resolved. In this post I will walk through a process you can create using Power Automate to make sure everything gets updated in a nice orderly fashion. 😊

As mentioned above, when a survey response comes through from one of the Contacts you sent on your D365 Marketing Customer Journey, the Contact record is linked to this activity via the From field. The response is also linked to the Survey record and a generic survey invitation record. That’s about it though! We can do better than this and make things easier to navigate and understand.

When we look at an alert created in D365 Customer Voice, it shows that it’s tied to a Marketing respondent.

So, first step is to create a new flow in Power Automate with a trigger from the Common Data Service/Dataverse connector that runs when a record is created. Select Customer Voice survey responses as the Table name, and add in a row filter that means this will only trigger when the response is tied to a Marketing respondent. You can use this:
msfp_respondent eq 'Marketing respondent'

The next step is an action from the same connector. We need to get a row and get the Customer Voice surveys that is linked from the Survey value on the Survey response in the trigger step above. This is purely going to be for aesthetic reasons so that we can clean up the subject on the survey invitation and the related survey response records. They come through with empty subject fields, which just looks a bit messy in my opion!

Now we need to find out who the Contact is that the response is linked to. We know that t he response gets linked to the From record on the activity. This field is tied to something called Activity Parties. We can use it to leverage back through to the correct Contact. We are going to use the List rows action from the CDS/Dataverse connector, and then filter to look for the record that has the Participation Type Mask value of 1 (the from or sender of the response).
_activityid_value eq @{triggerBody()?['activityid']} and participationtypemask eq 1

Now we use the get a row action to find the right Contact using the Party value we got from the last step. This will create an Apply to each step automatically for us.

Ok so now we have been able to find the right contact, we can go through and update the survey response that was created. Use the update a row action and use the Activity value from the initial trigger step. This is where I will update the subject of the survey response. You can call it whatever you want, but I am just using the Name from the Get survey step. Then we will update the Context Data field. This field controls what will be shown in the list of Parameters on the survey response in Customer Voice. In this example, I am just going to update it with the First Name, Last Name and Email Address from the Contact we extracted from the survey response From field.
{"EmbedContextParameters":null,"PipeData":{"First Name":"@{outputs('Get_a_row_-_Find_Correct_Contact')?['body/firstname']}","Last Name":"@{outputs('Get_a_row_-_Find_Correct_Contact')?['body/lastname']}","Email":"@{outputs('Get_a_row_-_Find_Correct_Contact')?['body/emailaddress1']}"}}

I also want to link the Survey Response to the Contact via the Regarding field. You could use the Regarding option and link it to other types of records that might make sense for your own requirements.

Next is the Survey Invitation. Although you don’t have to change anything about this, to me it’s nice to have everything linked together and updated to keep in sync with the other items. So we can get the Survey Invite record that the Survey Response is linked to. We can update the subject using the name from the Survey again. The invitation email address field can be updated with the Contacts email, as can the Respondent field with the Full Name of the Contact. You can also set the regarding field to link it to the Contact record too.

Finally we will do another list rows set to get any related alerts you might have. We will filter the rows to only show alerts that are linked to the original survey response created.
_msfp_surveyresponse_value eq @{triggerOutputs()?['body/activityid']}

We then do another Apply to each step and update the alerts that have been brought back in the list records step. We use the Activity value from that step to get the right ones. Update the Customer email field, Customer Name field and the Regarding option.

Now when a new survey response comes through, we can see the correct information in the survey response in Customer Voice by looking at the Personalized data tab.

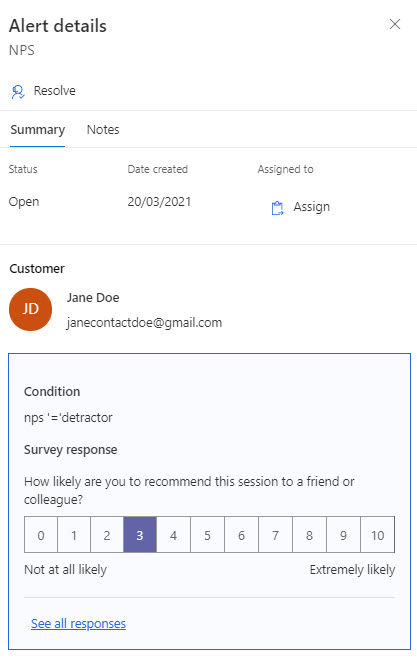
Our alert is now also linked to the correct person and shows their name and email address.
Check out the latest post:
Use Custom Event Registration Questions To Branch Your Journeys In Customer Insights
This is just 1 of 603 articles. You can browse through all of them by going to the main blog page, or navigate through different categories to find more content you are interested in.