*** NOTE: ALL INFORMATION IS ACCURATE AT DATE OF PUBLISHING ***
Email Templates in Dynamics 365 Marketing should make everyone’s lives a bit easier. You lovingly create it with the right content blocks and layout to make sure marketers simply need to select a template, edit their email and they are ready to launch it. To make it even easier, are you setting up all of the possible defaults? What about the potential to include additional settings? In this post I will cover what is already there out of the box, and two additional settings you might find useful on your Real-time Marketing Email Templates.
First things first, create your email template. Then click on the email header icon from the bottom on the settings area to the right of the template.

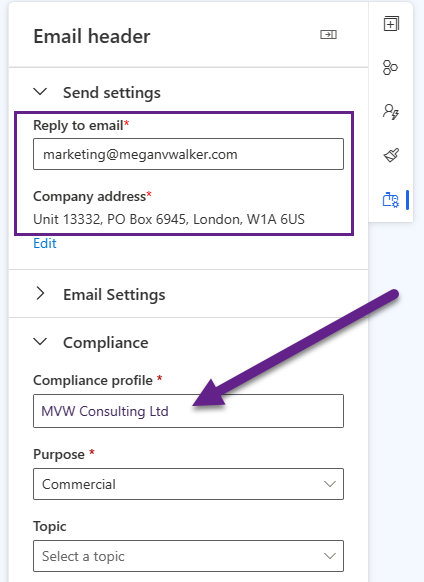
The send settings are first. The reply-to-email will populate with your own email as the creator but this can easily be changed. The address will populate based on the original default compliance record you have set up. Although you can edit the company address from here, we should instead use the compliance field instead to do this.

The email settings area is more informational than anything else. When someone creates an email and looks for a template, these fields can be used as filters to find what they are looking for quickly.

Next is the Compliance section. There is a feature currently in preview for compliance which adds in this new section and then includes Purpose and Topic. If you have not turned this preview on, the Purpose will be Legal designation, and the Compliance profile will be Compliance and both will be in the Email settings section above.

Then we have the Plain text. I suggest never changing this unless you have a real business need and requirement to generate all of this yourself!

Finally, you have the Design settings at the top where you can set the From name and email. This makes sure when a user is creating a new email and picks a template, they won’t have to change this from their own name and email. I don’t suggest adding a subject or preview text as it may go overlooked and not be changed… which could end up in embarrassing moments where you send out emails with ‘SUBJECT GOES HERE’ on them. Once you’ve added all of the defaults, save your template and it’s ready to use.

Now when we create a new email, we can see the reply to information is set. The Company address is then going to be pulled from the Compliance record you linked on the template. The legal designation or purpose will also be populated. Your from name and from email will also be accurate based on the values you added to the template. Perfect!
But how can we make this better? One of the features included in Real-time Marketing is the ability to set up Brand Profiles. You can edit the table for this so can really extend the records and link to all kinds of social media profiles, images and so on. I wrote about it here so take a look if you don’t know what I am referring to. How about setting the Brand Profile and even the Sender record you want to use from the Email Template? We can do that by adding two additional fields to the Email template table in Dataverse. If you search for the table you will notice two called Email Template. Pick the one with a lower case t on template. That’s the one you want. Two simple lookup tables, one to the Brand Profile table and one to the Sender table.

Now we need to add those fields to two forms. If you just add it to one, it will not work. First we are going to select the Designer form.

Although you might start from the maker portal, this form needs to be opened and edited in the classic editor.

Add your two new fields in to the Design section…. BUT be sure to untick the box in the properties that makes them visible by default. We must keep them hidden. Save and publish the form.

Now open the Email Template properties form, and again open it in the classic editor. Add your two new fields at the top of the Send settings section.

One the Sender field, we will edit the properties slightly so that we can only pick those linked to the Brand Profile chosen. Tick the box in the Field Behaviour section for ‘Disable most recently used items for this field’.

Then in the Related Records Filtering section, set it as you see below, and untick the box for Users can turn off the filter. Now save and publish this form and you are ready to review the form on an Email Template in D365 Marketing.

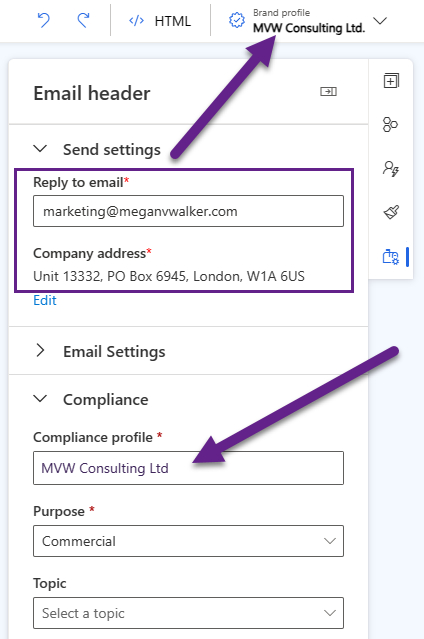
This is what the send settings now looks like. That’s great! We can pick the Brand Profile on the Template, then pick the Sender from those records added to the selected Brand Profile. This alone isn’t enough to make sure it gets added to an Email added when this Template is chosen.

We are going back to an old school work flow that runs real time. This blog isn’t about how to create these workflows… and there are tons of posts out there if you’ve never done this before… but we are creating a process that runs on the Email entity. However, there are two email entities and it’s not clear which is the right one until you’ve selected it. If it helps, I picked the first Email entity from the list and it happened to be the right one first time. We will run this when the record is created, but also ticking the record fields change box and then selecting the Template field from the list.

We then have a simple workflow that has a condition to check and make sure the template has a brand profile added. If not, the workflow will be ended. If it does, we will update the Email record.

In the update step on the properties, you can find the brand profile from the related template and set it in the field on the Email. Then do the same for the Sender field. Publish your workflow and then you are ready to test.

Now when a new email is created and saved, the workflow will run and set the Brand Profile along with all of the other values set on the template.
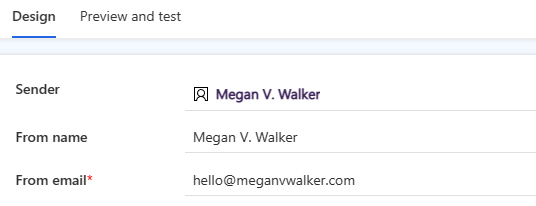
The sender information at the top of the Design tab will show the Sender and display the senders from name and from email address.
A bit of extra work, but could be very useful for marketers when they are creating their emails and mean they don’t need to worry about forgetting some of the settings. You can make sure the brand profile and sender is accurate along with the Compliance and other key aspects of the email.
Check out the latest post:
Use Custom Event Registration Questions To Branch Your Journeys In Customer Insights
This is just 1 of 603 articles. You can browse through all of them by going to the main blog page, or navigate through different categories to find more content you are interested in. You can also subscribe and get new blog posts emailed to you directly.
Hi Megan,
once again a great post! Can one use this too to adapt the company address based upon the selected brand profile? OOTB the company address for real time is set under Settings/Compliance, but only one record can be created for it. Would be great if this could also be changed based upon the selected company as different brands are often headquartered elsewhere.
Have you tried this?
Hi Laura, the company address will always pull from the Compliance record, and not sure you would be able to circumvent that OOB functionality. You can have multiple Compliance records so can set different addresses on each one if you needed to. If you don’t seen an option to add other records, check the Feature switches and make sure you have the ‘Configurable compliance settings in email editor’ setting turned on.