*** NOTE: ALL INFORMATION IS ACCURATE AT DATE OF PUBLISHING ***
Online events are a big part of marketing. Ideally your customers sign up to gain more insights from you as subject matter experts, and new prospects register because they are interested in your products or services and want to hear what you have to say. Win/Win! D365 Marketing provides an Event planning and management area to set up your webinars (or in-person events) and use Microsoft Teams as part of the process. I wrote a full series of blogs about how to do this, but using Outbound Marketing. What about how this might be possible with Real-time Marketing? Think of having 1 Trigger, 1 Email and 1 Journey. Each time someone registers for an event they get a fully customised email that relates to the correct Event, including a calendar invite they can add to their calendar. Wouldn’t that be cool? Let’s see how it can be done.
NOTE: This was written quite some time ago, and changes have been made since that this is no longer needed. Although you can still use this approach if you want a fully custom ICS file, it’s not needed to make sure you have one for each Event that is registered for. The out of the box trigger will allow for this.
The first thing, if you’ve never created an Event before, go ahead and read the following three posts:
Create Your Custom Trigger
Once that is sorted, we now need to create a custom Trigger to use in our marketing email(s) and journey. For those of you who have dug in to this already, you will know that there is a Marketing Event Registration Created trigger that exists out of the box. Although you can get a lot from it, one thing is missing, and that’s the ability to do anything about a calendar invite (ICS file). You would need to create a different email for each webinar, and therefore create a different journey for each one too. Creating our own custom Trigger means we can get exactly what we need. Navigate to the Triggers area under Real-time Marketing and then click New Trigger. Give it a name and description.

Now add in the variables needed. We will be passing through the right data when someone registers for the webinar via the marketing form you’ve added to your website. You don’t need all of these, but read through to the end to see what I do with them, then you can decide what to leave out of your trigger (or add in if you think I’ve missed something!). Make sure the data type is text for all of them except the Event Start and Event End Time. Those should be set as Date/Time. Remember, you don’t need to set up anything for values from the Contact, you can get those without the need for a trigger. Walk through the next screens and then finally make it live by clicking on the Ready to use button.

NOTE: This was written quite some time ago, and changes have been made since that this is no longer needed. Although you can still use this approach if you want a fully custom ICS file, it’s not needed to make sure you have one for each Event that is registered for. The out of the box trigger will allow for this.
Create Your Marketing Email
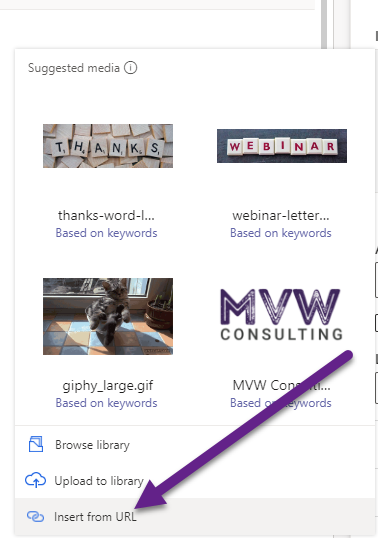
Once the Trigger is live, we can then set up our email and use the values from the Trigger. Select your template then start creating your email. For each Event, you might use the Event Image column on the Website and form tab to add something unique for each one. Let’s add this so the top header image of the email is different depending on which event it is for. Add an image to the email then pick Insert from URL.
Type directly in to the field and call it something like {{EventImage}}. Then click Insert. Nothing will display, but if you also decide to use an Event Image and pass through the URL for the image in to your trigger, it will be displayed.

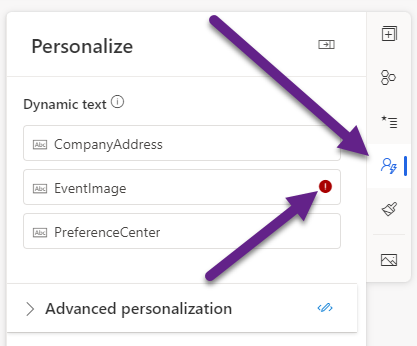
We need to map this dynamic content to the right trigger value. Click on the Personalize option from the right, and you will see the new EventImage you added with a red icon next to it. Click on the Event Image dynamic personalisation tag you added.
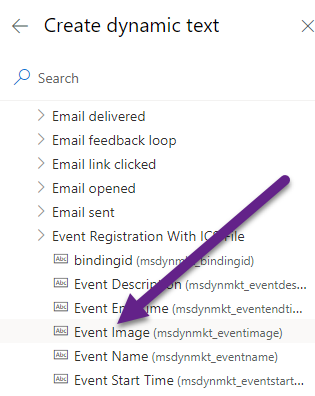
Now you can map it and find the Event Registration trigger you created, then select the Event Image value from the list.
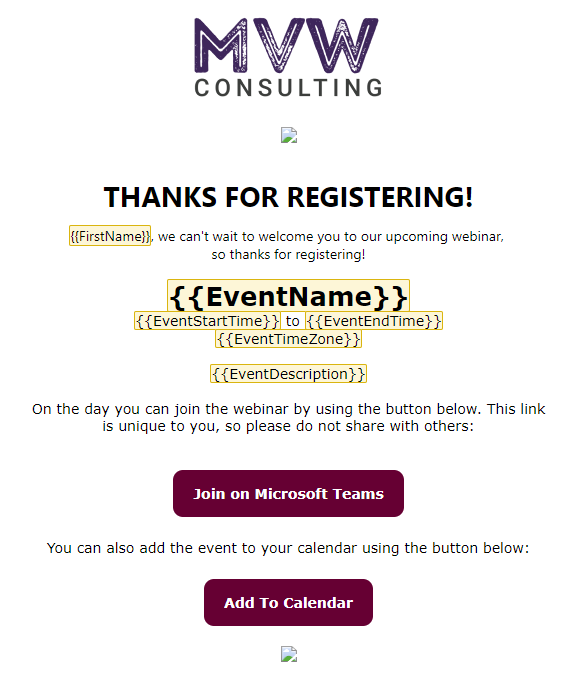
You can keep building out your email based on your own requirements. Below you can see where the header image would show (just a little image icon for now), the Contact’s first name, the Event Name, Event Start Time to End Time and the Time Zone. Then I have added the Event Description. For the two buttons I am passing through the Unique Join Link for the Join on Microsoft Teams, and the Unique ICS File for the Add To Calendar. Finally, you can see another blank image which I added in the same way as the Event Image, but instead used the QR Code value which will also be passed through as a URL. Save your email and mark it as Ready to send. Consider creating other emails if you want to do a full set similar to how I showed in this post for Creating Marketing Emails, but using Real-time instead of Outbound Marketing.
NOTE: This was written quite some time ago, and changes have been made since that this is no longer needed. Although you can still use this approach if you want a fully custom ICS file, it’s not needed to make sure you have one for each Event that is registered for. The out of the box trigger will allow for this.
Create Flow One – New Event Created
You only need this part if you want to create an ICS file that you can then send to a Contact who has registered for an event. If you don’t want to do this, you can ignore this section. We cannot add attachments to D365 Marketing emails (yet!) but we can add buttons that link to a file stored somewhere online that is accessible to people outside of our organisation. So the first thing you will need is to decide where you store those. In this example I am using SharePoint, most organisations already use it. You will need to make sure you can create links to share documents with people outside the organisation. I wanted to create a process that could also allow for a quick clean up at the end of an event. For that I figured when an Event is created, a flow will create a new folder, simply using the Event GUID. That then gives you options to run another flow at the end of an Event to find the folder with the same name based on the GUID and delete it along with all of it’s contents. Then you aren’t wasting space with old files.
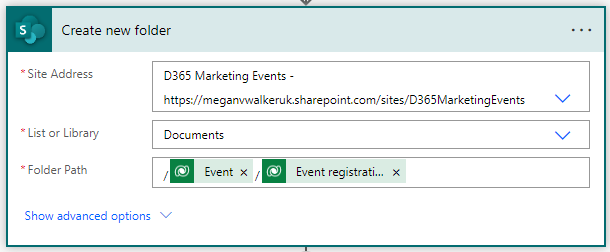
So this first flow is simple. Two steps. The first is your trigger using the Dataverse connector that runs when a new record is Added. The table name is Events, and your scope is Organization. You can of course add more filtering to this should you need it, but this just gives you the basics. The second step is the action of Create new folder from the SharePoint connector. Select the Site Address you want to use, then the top level folder to put the new folder in to. Finally, use the Event id for the Folder Path, which gives it the GUID name.

Create Flow Two – New Event Registration
NOTE: If you name your steps the same as mine, you should be able to copy and paste from the expressions I have shared. If not, then you will need to restructure them based on your own flow.
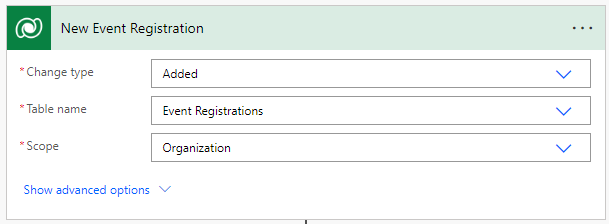
This is the flow that will run when someone fills out your marketing form online that you have linked to an Event. This creates an Event Registration record and is the starting point of our flow in a trigger from the Dataverse connector. So when a record is added, and pick the table name of Event Registrations. Set the Scope to be Organization.
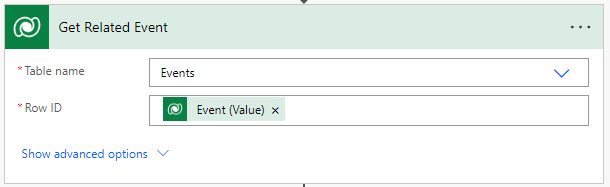
Next we have an action, again with the Dataverse connector, and Get row by id. Use the Event from the trigger to get the related Event.
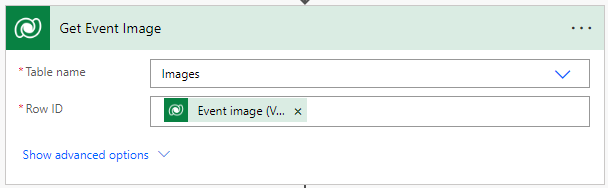
Then another Get row by id, this time for the Images table using the Event image value from the previous step. If you don’t intend on using Event images you can ignore this step entirely.
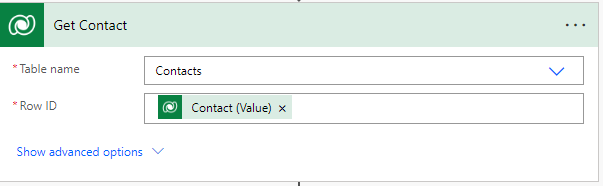
And another Get row by id, this time for the Contact that is linked to the Event Registration from the original trigger of the flow.
NOTE: Thanks to Matt Johnson for this next part about where to get the necessary org id from. Originally it was in a Marketing configurations record. Updated section below to reflect the change and new place to access it.
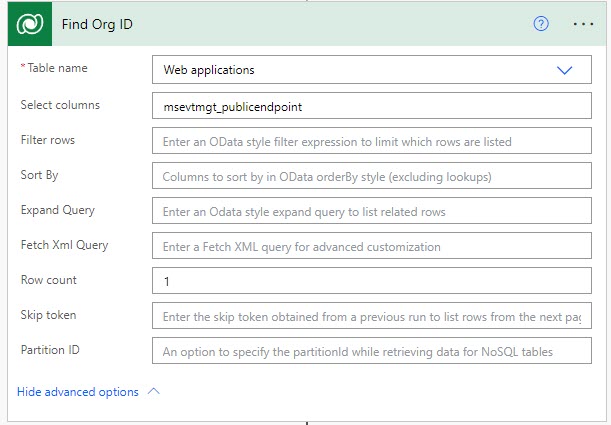
Now we need to get an id that is tied to a Web applications record in your environment. It’s unique for each one, and is not the same thing as the main Dataverse org id. So we will use a List rows action step from the Dataverse connector for the Web applications table. We only need one column, so in select columns add msevtmgt_publicendpoint. There should only be one record but I have added 1 as the row count to only bring back one record. We can then use this later on in the flow when we need to generate some URL’s that need this id included in them.
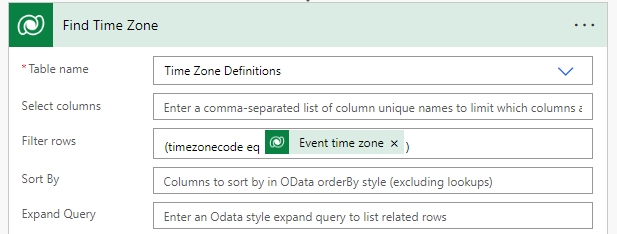
Another List rows step, this time for Time Zone Definitions. An ICS file needs to know the time zone in a very specific format and naming convention, and not one that D365 has values for. Or, we can simply add Z to the end of a date and time stamp to indicate it’s in UTC (0) time. Without these next few steps, the person receiving the calendar invite could get it with the wrong date/time for their local timezone. For example, an event at 10 AM EST should be 3 PM in the UK. However, without converting the timezone first, the recipient would get a calendar invite for 10 AM and appear to be 10 AM UK time. So, the easiest thing to do is to find the time zone from the event. We can add in a filter to the Filter rows option. This will get us the right time zone from the Event.
(timezonecode eq @{outputs('Get_Related_Event')?['body/msevtmgt_eventtimezone']})
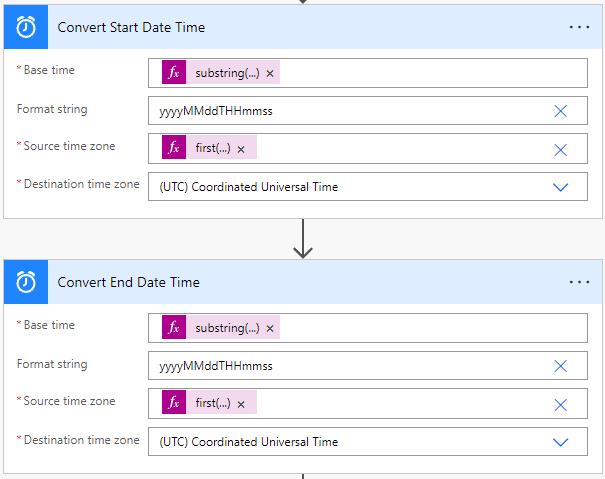
Now we need two steps from the Date Time connector, and use the Convert time zone. One is going to be for the Start Date Time and one for the End Date Time. For the base time, it will have the Z already added to it. I want to remove that first so have an expression that will do this. It takes off the last character in the string. Then we format the string by using a custom format (scroll to the bottom of the list and click Enter custom value then paste this: yyyyMMddTHHmmss. For the Source time zone, we need to get the standard name from the Find Time Zone step. Using a List rows step means we would get an Apply to each loop if we just add the standard name field directly, so we can use an expression to get the first record found (which should be the only one) and use the field directly from there. The Destination time zone should be set as UTC Coordinated Universal Time.
For the Start Date Time:
substring(outputs('Get_Related_Event')?['body/msevtmgt_eventstartdate'],0,sub(length(outputs('Get_Related_Event')?['body/msevtmgt_eventstartdate']),1))
@first(body('Find_Time_Zone')?['value'])?['standardname']
For the End Date Time:
@{substring(outputs('Get_Related_Event')?['body/msevtmgt_eventenddate'], 0, sub(length(outputs('Get_Related_Event')?['body/msevtmgt_eventenddate']), 1))}
@first(body('Find_Time_Zone')?['value'])?['standardname']
The next action is a Compose step. This is needed to strip out some values from the Registration ID. It’s stored with an ER and then a space. This means when we try and pass it, it adds a gap which breaks any URL’s. So we need to strip out the first 3 characters to just leave us with the ID part of the Registration ID. We can then add in the ER and a plus sign later which will make a full URL without breaking anything. So, in your compose step, click on Expression and add in the following:
substring(triggerOutputs()?['body/msevtmgt_name'],3)

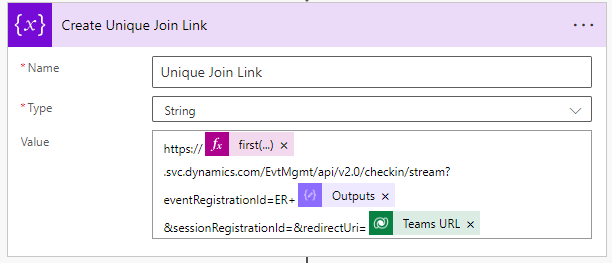
Now we need an Initialise variable step to create a unique join link. This is not stored anywhere, which is why we need to piece things together to generate it. For this, give your variable a name and select the type of String. Then we piece the string together like this. If you have named your steps the same, you should be able to just paste the expression below directly in to the value box. This pulls the Marketing org id (using the first approach as above rather than Apply to each), the output from the registration id step and the teams url value from the Event.
https://@{first(body('Find_Org_Id')?['value'])?['_organizationid_value']}.svc.dynamics.com/EvtMgmt/api/v2.0/checkin/stream?eventRegistrationId=ER+@{outputs('Remove_First_Part_Of_Registration_ID')}&sessionRegistrationId=&redirectUri=@{outputs('Get_Related_Event')?['body/msevtmgt_attendeeurl']}
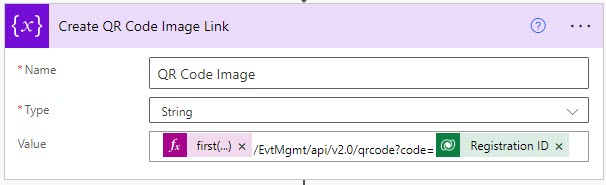
For the next step, another Initialise variable step as a string. Only needed if you want to add a QR Code. I am not sure I see the point if it is an online webinar, but I wanted to show you how to get it just in case. For this one, your URL should look like this, with the endpoint value, some extra parts that are needed in the URL, and then at the end add the Registration ID from the trigger at the start of your flow.
@{first(body('Find_Org_Id')?['value'])?['msevtmgt_publicendpoint']}/EvtMgmt/api/v2.0/qrcode?code=@{triggerOutputs()?['body/msevtmgt_name']}
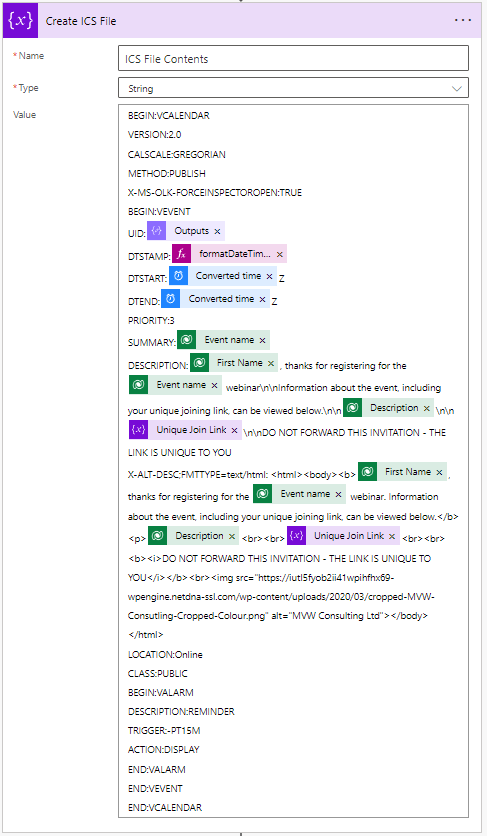
The next step is to create the ICS calendar event file. Thanks to Manuel Gomes for his blog post on this which gave me the starting point I needed. I was then able to figure out how to make the description of the ICS file pretty with HTML, including adding in an image. If you’ve named your steps the same as mine you should be able to copy and paste the information below and use it in your step. If not, just pay attention to the formatting of the date/time stamps that need to have the Z added after them in order to work. Notice that I have a DESCRIPTION part and then an X-ALT-DESC part which includes HTML. You don’t need both, but the HTML part will show in Outlook and looks great. The main DESCRIPTION is used by Google when importing a calendar ICS file. If you want to show an image, make sure you put the link to YOUR image in that section.
BEGIN:VCALENDAR
VERSION:2.0
CALSCALE:GREGORIAN
METHOD:PUBLISH
X-MS-OLK-FORCEINSPECTOROPEN:TRUE
BEGIN:VEVENT
UID:@{outputs('Remove_First_Part_Of_Registration_ID')}
DTSTAMP:@{formatDateTime(utcNow(), 'yyyyMMddTHHmmss')}
DTSTART:@{body('Convert_Start_Date_Time')}Z
DTEND:@{body('Convert_End_Date_Time')}Z
PRIORITY:3
SUMMARY:@{outputs('Get_Related_Event')?['body/msevtmgt_name']}
DESCRIPTION:@{outputs('Get_Contact')?['body/firstname']}, thanks for registering for the @{outputs('Get_Related_Event')?['body/msevtmgt_name']} webinar\n\nInformation about the event, including your unique joining link, can be viewed below.\n\n@{outputs('Get_Related_Event')?['body/msevtmgt_description']}\n\n@{variables('Unique Join Link')}\n\nDO NOT FORWARD THIS INVITATION - THE LINK IS UNIQUE TO YOU
X-ALT-DESC;FMTTYPE=text/html: <html><body><b>@{outputs('Get_Contact')?['body/firstname']}, thanks for registering for the @{outputs('Get_Related_Event')?['body/msevtmgt_name']} webinar. Information about the event, including your unique joining link, can be viewed below.</b><p>@{outputs('Get_Related_Event')?['body/msevtmgt_description']}<br><br>@{variables('Unique Join Link')}<br><br><b><i>DO NOT FORWARD THIS INVITATION - THE LINK IS UNIQUE TO YOU</i></b><br><img src="LINK TO YOUR IMAGE" alt="Alt Description for accessibility"></body></html>
LOCATION:Online
CLASS:PUBLIC
BEGIN:VALARM
DESCRIPTION:REMINDER
TRIGGER:-PT15M
ACTION:DISPLAY
END:VALARM
END:VEVENT
END:VCALENDAR
Now we get in to the part of this second flow that will link to the SharePoint folder created in the first flow. Add the create new folder action from the SharePoint connector. Pick the same site address used in flow one, and the Documents library (or whatever you picked before). Now you can set the folder path to use the Event GUID first (which means it will put your new folder in the folder created in flow one for the Event) and then the Event Registration GUID.
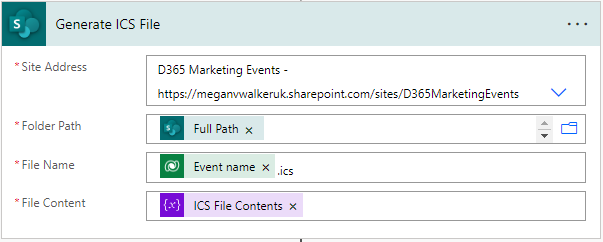
Now we need to take the ICS file contents and actually create that as a file in the new folder created in SharePoint for this specific Event Registration. We pick the same site, and can then use the Full Path value from the step above. The file name can be anything, but I have just called it the name of the Event then .ics to give it the right extension. The File Content is going to be the variable for the ICS File Contents we created above.
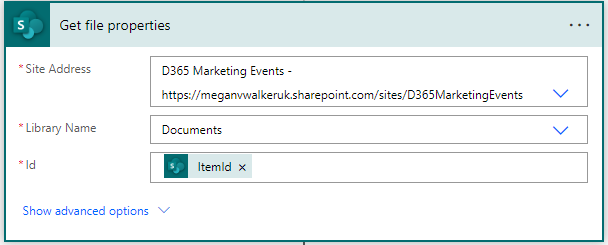
The next step is the Get file properties action from SharePoint. Set the Site Address and top level library name (same one you used in the other steps) and use the ItemId as the ID from the step above.
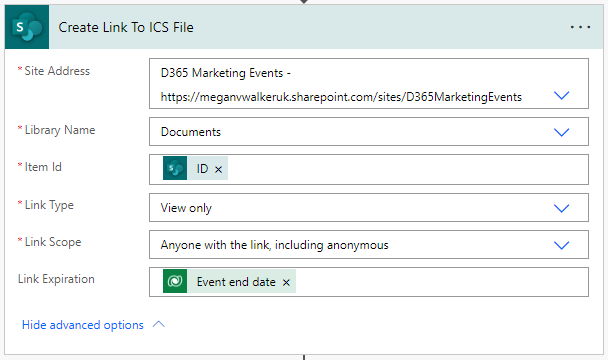
The last step from the SharePoint connector is to make a link to it that is accessible outside your organisation. Use the action of Create sharing link for a file or folder. Again, set the site address and library name the same as you have used in previous steps. Use the ID from the previous step as the Item Id, set the Link Type to View only and the Link Scope to Anyone with the link, including anonymous. You can also expand the advanced options and add a link expiration adding the Event end date as when it will expire.
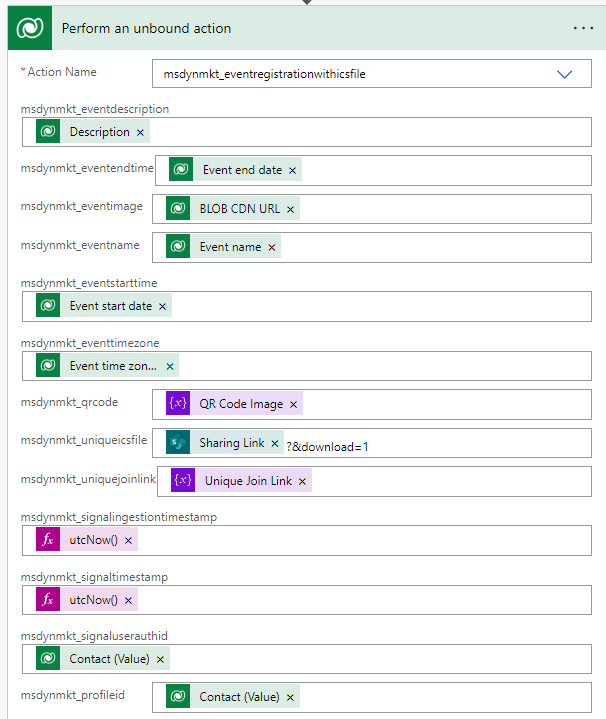
Now the last step, putting it all together and starting the custom trigger so the Contact who registered will be put in to a Journey. Choose the Perform an unbound action from the Dataverse connector. Then in the list of actions, scroll to those that start with msdynmkt_ and then look for the new one you created. Once you select it, you will see all of the variables you added. Now you can start populating them with dynamic values. We have the description, Event end date, BLOB CDN URL for the event image, Event name, Event start date, Event time zone, your QR Code Image variable, the Sharing Link from the last step, and Unique Join Link variable. For the Sharing Link, add ?&download=1 to the end of it. This will make it a file that downloads automatically when the button is clicked in the email, rather than taking the person to your SharePoint site. For the signal ingestion timestamp and signal timestamp, past in @{utcNow()}. For the signal user authid and profileid, use the Contact id from the Get Contact step added near the start of the flow. Phew! That’s all the steps. It might seem like a lot, but keep in mind I’ve shown you step by step to hopefully explain everything to make it clear.
Create Column To Save ICS File
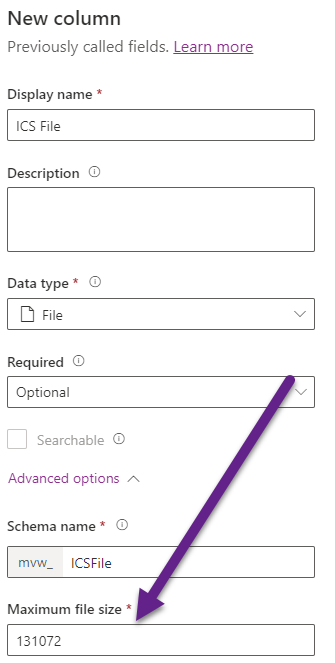
This part again is optional. I thought it might be useful for a D365 Marketing user to have access to the ICS file that gets generated without having to go and hunt for it in SharePoint. That way if the Contact gets in touch and says the didn’t get the email, it can still be accessed and sent to them. For this, add a new column to the Event Registrations table. Set it as a File type and make sure you open the Advanced options area to increase the max file size. 131072 is the largest it can be.
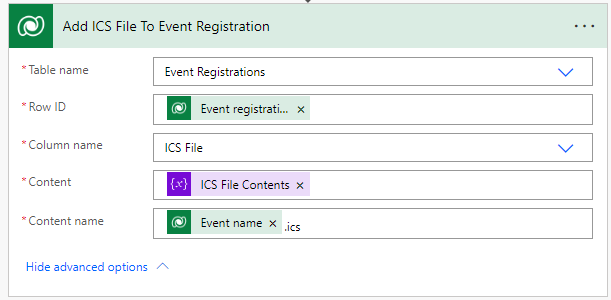
Add this step in to the end of the second flow you created. Choose the up a file or an image from the Dataverse connector and set the table name as Event Registrations. Set the row id as the Event registration id from the original trigger step. You should then see your file column in the list. Expand the advanced options, and now set the ICS File Contents variable as the content, and use the Event name dynamic value and then .ics to give it the right file name.
Now when someone registers and they reach the end of the flow, the file will be added to their Event Registration record. Easy to access and download if needed. Keep in mind that you might want to have some process of cleaning up these files at the end of the event, so up to you how you want to manage it.
Create Your Real-time Journey
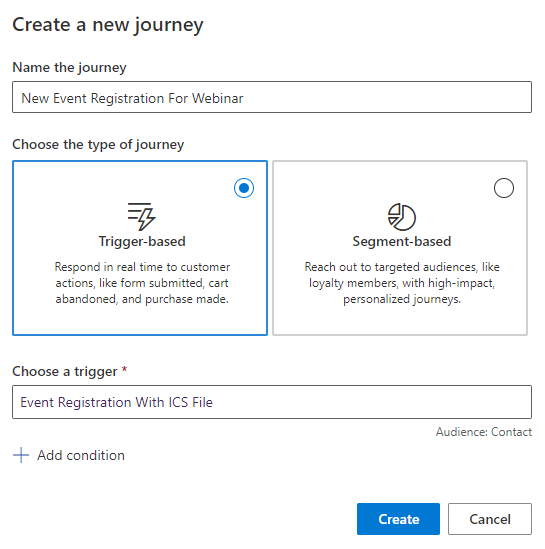
Finally we get to the end and can create the Journey to kick things off. You can build this as simple or complex as you would like. In this example I just have two steps, the trigger and the email. First, we got to the Journeys section in the Real-time marketing area to create a new one. Give your journey a name, and then make sure the type of journey is trigger-based. Then pick the new trigger you created from the list. Click on the Create button.
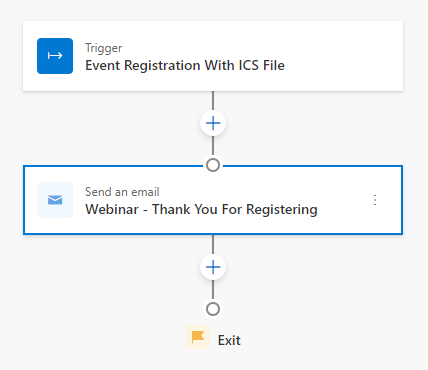
Now we can add a step and select to send an email. Pick the email you created earlier as what you want to send.
Create An Event Registration
Now fill out your form! You need to make sure it all works. Once you have completed the form, wait a few moments. The event registration will kick off your flow which needs time to run, and then drop the Contact in to the Journey at the end. Then the Journey needs time to push the Contact through. So it won’t be seconds but it should be at least within 5 or 10 minutes. You should get your email.
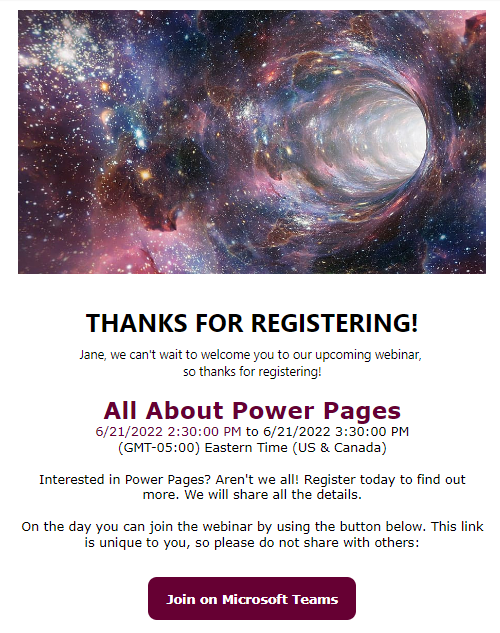
Here we can see the first part of the email that has used the image from the event, along with the event title and times including the timezone. We then see the description and a button that has a unique link that when clicked on will take the Contact in to the event in Microsoft Teams.
Scrolling down, there is also the Add To Calendar button and the QR Code (again, only if you feel it adds value for your requirements).

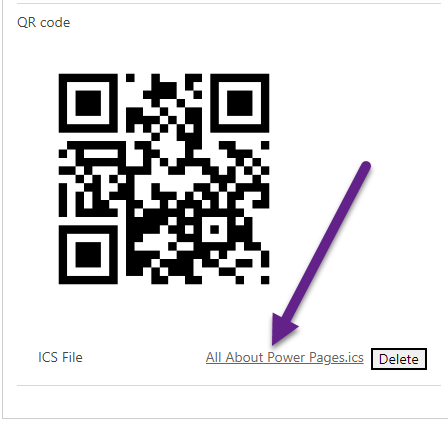
Clicking on the Add To Calendar button, you should then see your ICS file download.

Open up the ics file and check the details. It should be all about the webinar you registered for. Hooray! This can then be saved by the recipient to add it to their calendar so they don’t miss your event. Perfect.

Check out the latest post:
Send Unique Event Registration Response With QR Code Using No Code
This is just 1 of 449 articles. You can browse through all of them by going to the main blog page, or navigate through different categories to find more content you are interested in. You can also subscribe and get new blog posts emailed to you directly.
I followed through your guide with great interest. I was very impressed. However, I’m getting a different guid for my Marketing Configurations table than what I was expecting. There is only one row in that table because I’ve checked so it’s not like it’s because I’m picking the first out of two or anything like that. I wonder why my Marketing Configurations table does not contain the correct guid for my site. For now I’ve just checked what it should be by looking at the actual QR code image that Marketing generates and hard coded that into my URL’s where I need to in the flow.
In fact I was looking at the data in that table for a couple of my D365 environments (all with Marketing enabled in them) and it’s got the same (wrong) guid in all of them. Very strange
Hi Megan, I had a little ask around internally after I struggled to get the dynamic url in the same way you did. Turns out the address is stored in the Web Applications table under the column, Endpoint. This gives you the full address up to the “/EvtMgmt/api/v2.0/qrcode?code=” bit which should mean a bit less slicing and dicing. Strange how you got that part of the address from a different table.
Hi Matt, sorry for the delay in responding! I edited your last comment to remove your link, just in case that’s something you wouldn’t want broadcast to the world.
Interestingly I was recreating this again for another client, and sure enough, as you found, the dynamic URL could not be pulled in the same way. Definitely things have changed since I last wrote this (which wasn’t all that long ago!). I will revise the post to update some of the steps as needed. Thanks for flagging this! Going to look under the Web Applications table and try that out!
Interestingly, they also said this table Web Applications will most likely not be there in the future. They didn’t give me an alternative right now and they didn’t say when it will be no longer supported. Something to keep an eye on for sure. This article is getting some attention with my peers right now. Everyone is so thankful for your content.
Ah good old Microsoft making changes lol. Always the need to modify things we have done in the past to fill the holes!
So glad I came across this post as I have been struggling to work out why the ‘Add to Calendar’ button was not working on emails received through a Real-time Marketing Journey.
An email created through Outbound Marketing has the ‘Add to Calendar’ functionality working without the need for extra steps.
Any ideas why Real-time Marketing has got us jumping through hoops to get the button working (same issue with ‘Join in Teams’ too)?
Hi Michelle, you could build your real-time marketing journeys for events WITHOUT having to build out another trigger. The purpose of this is if you want to have ONE journey that runs and pulls in the right information each time. If you did a journey for each event, you would then need a set of emails for that event so you can set the event and link to the Join in Teams or Add to Calendar. Does that help?
Hi Megan,
Yep, I understand exactly what you’re saying now. Thanks!
I had initially tested it all with one event and one email and still had an issue, but on reflection, the issue could’ve been me.
I’ll try again.
Many thanks,
Michelle
No problem! Give it another try and hopefully it will work without issues! Good luck!
I just tried it again. One event, one email with the Add to Calendar button linked to that event.
I receive the email but when I click on the Add to Calendar button it doesn’t do anything.
My Journey is using the ‘Marketing Event Registration Created’ trigger.
If I do all this from Outbound Marketing, it works fine.
Did you run through the journey and fill out your form? Or send a test email to yourself? If you just send a test, that link wouldn’t be populated, only when it’s live.
I ran through the journey and filled in the form. I didn’t do a test send.
Hmmm and on your buttons you have them set up similar to this Michelle?

Yes that’s right.
It’s a mystery…
Not sure what’s going on…
Then my last suggestion would be to try Microsoft support. 🙄
Hi Megan,
I think I have found the issue.
The Add to Calendar and Join in Teams buttons don’t work for events created using the new method ‘+ In real-time marketing’.
Have you seen this option? When you click the button to create a New Event you get the option to create it in ‘Real time Marketing’ (Feature Switch).
I tested an event created the traditional way and then one created the new way. The traditional event worked, the real-time event did not.
Glad you figured it out! I have seen the option but it’s so new I haven’t tested out the process yet. I will try it in my own system and feedback to the team at Microsoft to make sure they are aware. One thing you cannot yet do with the new real-time marketing option for events is add event registration questions. So I will be staying away from it with customers for a while until that is included.
Thanks Megan. Much appreciated!
I also noticed you can’t add custom questions so, you’re right, no point using it for the time being.
If you don’t mind, I’d like to run one final conundrum I’ve got by you if I may….
My Events website is running on Power Apps Portals (https://…../powerappsportals.com) and it is linked up to my Marketing environment. That’s all fine and it is working, however, I want my events to use my custom event registration form not the default one.
The feature is turned on.
The Event Registration form is live.
The Event is set to use my Event Registration form.
The Event is live.
When I go to my event on the portal and click on the Register button, it still shows the default form rather than my new marketing form.
I can only think that it has something to do with the fact that my portal is (https://…../powerappsportals.com).
Do you have a similar setup and are you able to replicate it?
Hi Michelle, I am guessing it is maybe a caching issue. Clear the cache of the portal and see if it still shows the old one. If so, I would suggest contacting Microsoft support for assistance!
Hey Megan,
Sorry, I put my comment against the wrong article.
Should’ve been against this one:- https://meganvwalker.com/real-time-marketing-contact-insights/
Hi Michelle, check out the right article. I just answered the same question for someone else this morning. Look at the bottom of the article for a link to some information. Hope that helps!
Hi Megan,
I’ve done some testing and I think that the first flow might be unnecessary… As far as I can tell, SharePoint creates the specified path automatically if it does not exist!
Hi Klaas, by first flow, do you mean the one that runs when an Event is created? If so, are you seeing that when the first registration gets created and you set the path of EVENT_GUID/EVENT_REGISTRATION_GUID, it just creates the EVENT_GUID folder if it’s not already there… that’s good to know! I just went with the first flow because I figured it was needed to start the process – but if not and you confirm it isn’t, that’s one less flow to worry about! ☺️
Yes, that’s correct! The Event folder get created automatically if it does not exist when the Event Registration folder gets made… really nice!
Hi Megan, I would like to thank you for this very clear article and being able to generate the individual Team link.
You are very welcome!
Hi Megan! This is such a great post! I can’t wait to offer this to a client in my next marketing implementation. If I just wanted to just send a thank you email after an event registrant registers, I would use the OOB trigger ” Marketing Event Registration Created,” right? For some reason, I can’t get this to fire. Do I need to use Flow to get this to work?
Yes you can use that one! You don’t have to do a custom trigger, it’s only really if you want to have something truly customised and automated to run for every single Event. You do not need to use flow to get it to work. If it isn’t firing, you might need to open a ticket with Microsoft unfortunately! Just double check your Contact and make sure they haven’t opted out, and also make sure you don’t have frequency capping on for the journey as both would potentially block the email from going.
Yep! Msft support had to sort it out. The flow was failing for some reason. Thanks for the reply! 🙂
Hi Megan,
Thanks – another really useful post! I was wondering though if you had any experience or knowledge of how to create an event registration record from power automate. I have just developed a QR code scanning app (very cool) but the users now want to be able to register any contact from the app. I know how to pass through the event and contact ID, but Power Automate still wants the registration ID and ticket ID – bith of which are auto created when a contact registers through a form…
Any help appreciated!
Hi Thomas! Yes, just edit the Registration ID field to make it is optional rather than business required. The system will generate that field automatically for you so you can use power automate to create the record and not need to worry about needing to set a registration id. I am not sure about the ticket id as I haven’t used that field but I am thinking it might act in the same way. Just test it out. Does that get populated automatically? If so, make it optional and that might just do the trick for you!
AH that does seem like a simple solution…yes, both fields are mandatory and autopopulated. I’ll give it a go…thanks!
Hi Megan, Thanks for the informative article, love all your blogs and hope to see more related to Real Time Marketing (RTM) in the future. I have a question related to adding Custom Registration fields to the Event Registration forms for RTM, can’t seem to find a way to add that unless i have completely missed something very obvious. We have spun an instance in early September so don’t have access to the Outbound Marketing functionality, hence the question. Thanks
Hi Sapan, unfortunately currently there are no Custom Registration fields available for Real-time Marketing Event Registration forms. However, as per this page on Microsoft’s documentation, you should be able to contact support at this point to add in the outbound features. No idea how long this option will be available for! https://learn.microsoft.com/en-us/dynamics365/customer-insights/journeys/real-time-marketing-move#default-customer-insights—journeys-installation
Hi Megan, great article! How would you go about implementing an automated event journey with UTM tracking? I’m concerned about the UTM parameters altering the invitation link.
Hi Paul, if the UTM tracking is altering the URL for the event which is then breaking it, you can click on the link when you create the email and turn off tracking for that specific URL. Hope that helps!
Hi Megan,
My scenario is that we host a webinar event that has two sessions (morning and afternoon) but both are identical presentations so we only expect users to register for one or the other.
The OOTB Event Registration trigger looks to be able to do most of what you have developed here now but I’m wondering how you would customize this to run on a session registration “1 Trigger, 1 Email and 1 Journey” setup.
Then our emails would trigger with information from the specific session the user registered for. ei Time, Teams link and ICS file
Hi Ben, you would need to add something to the trigger that captures Session 1 or Session 2… then you could branch the Journey based on that value.