*** NOTE: ALL INFORMATION IS ACCURATE AT DATE OF PUBLISHING ***
In a previous post we looked at updating a Contacts D365 (CRM) image from a Twitter profile. Although the image displays within that application, it’s not something you can use to display it anywhere that needs the image to be accessible to the outside world. For example, if you want to use the image using the Desktop PowerBI version, you won’t be able to use the entity image. It’s also a challenge if you want to use the image on a portal. So, how can we go about getting an image from Twitter, and adding it to a Contact record, to then use elsewhere? Let’s look at a process using workflows AND Power Automate (formerly Microsoft Flow).
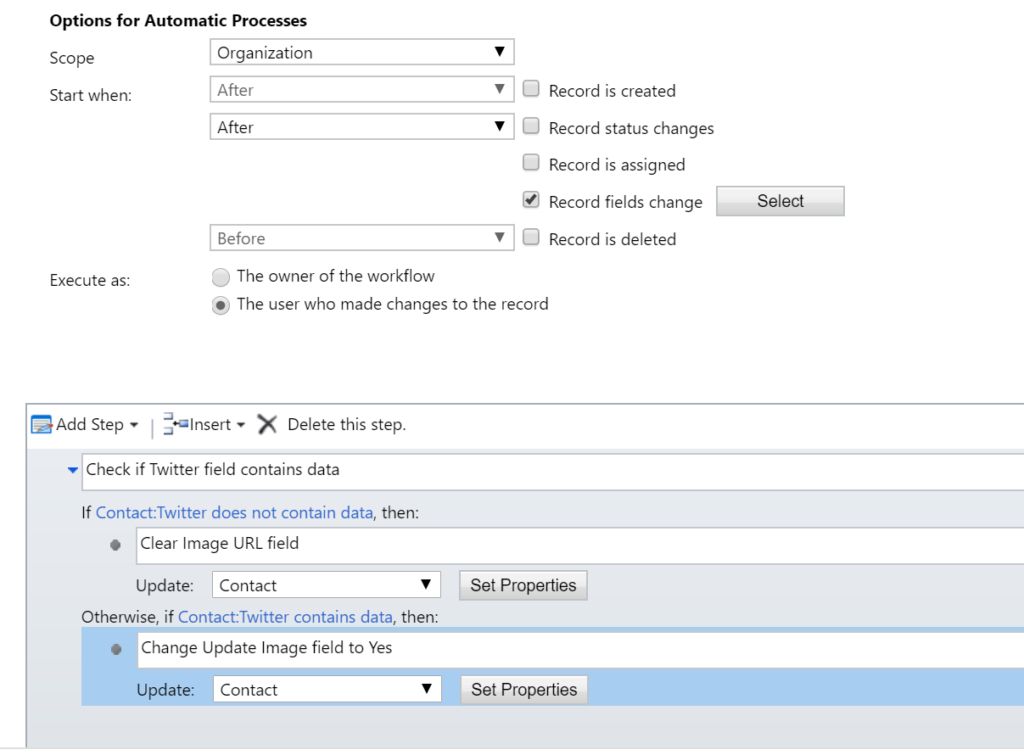
First, add a few new fields to the Contact entity. Add a single line of text to store the Twitter handle, a single line of text (URL) to store a link to the image, and a Yes/No two option field called Update Image. We will use this to trigger the running of a flow. Create a new real time workflow in D365. Run it on the change of the Twitter field. Now add two conditions to check to see if the Twitter field contains data. If it doesn’t clear the Image URL field. If it does, change the Update Image field to Yes.
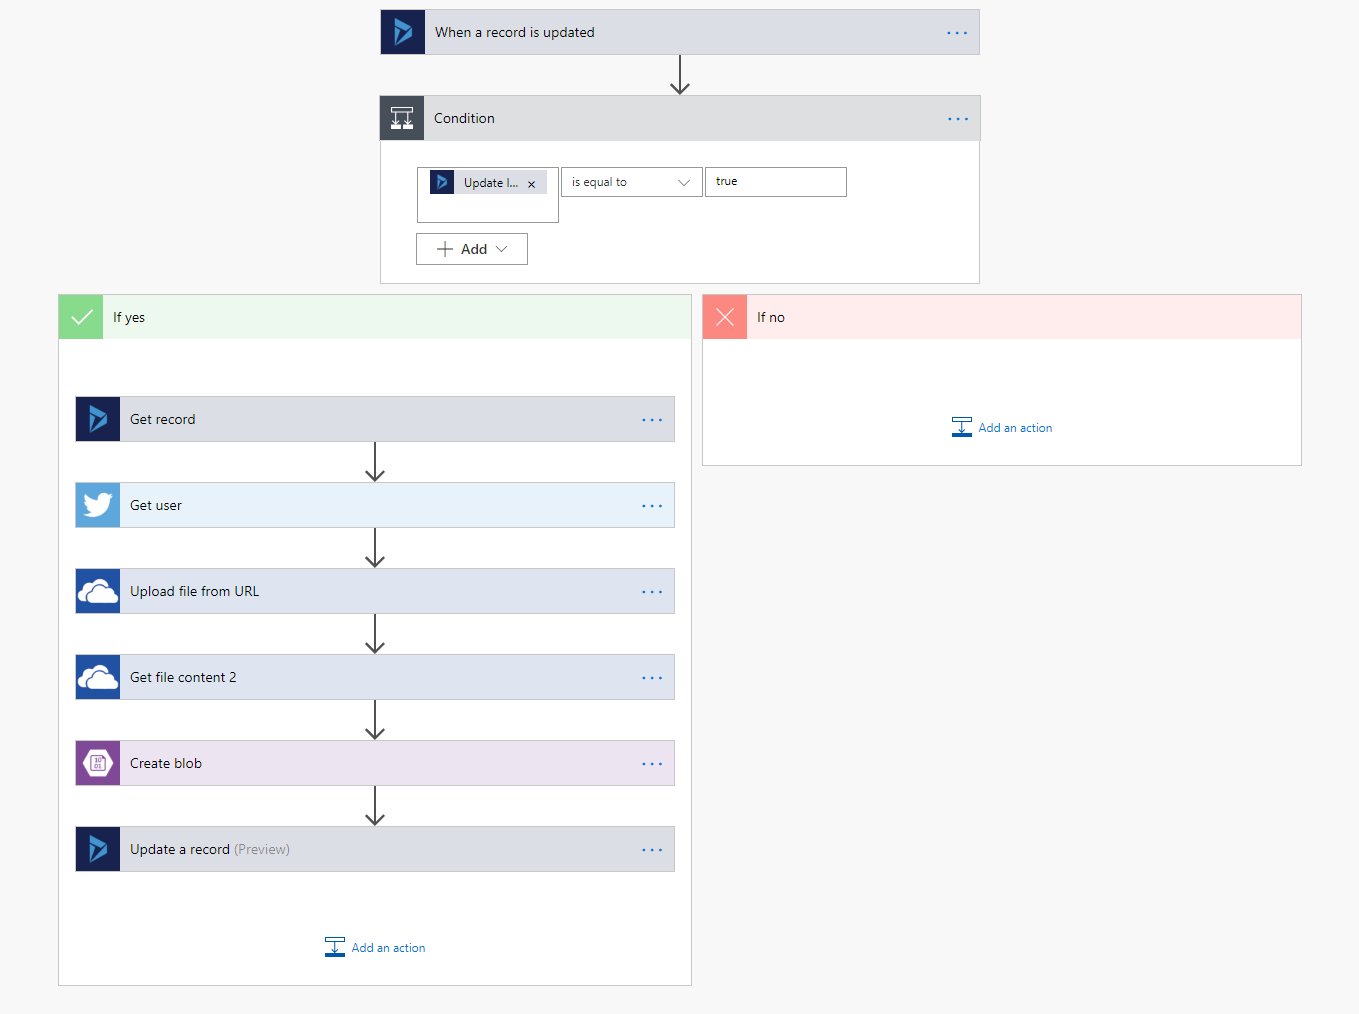
Now lets create our flow in Power Automate. If you haven’t create one before, check out this post for an example. Below is the full Flow, but each step will be reviewed in detail. In brief, when a Contact record is updated, we will check to see if the Update Image field is set to Yes. If it is set to No, we will end the flow and do nothing else. If it is set to Yes, we will get the Twitter users public profile image, add it to OneDrive, then move over to Azure Blob storage. From there we will update the Image URL field with the link from Azure Blob.
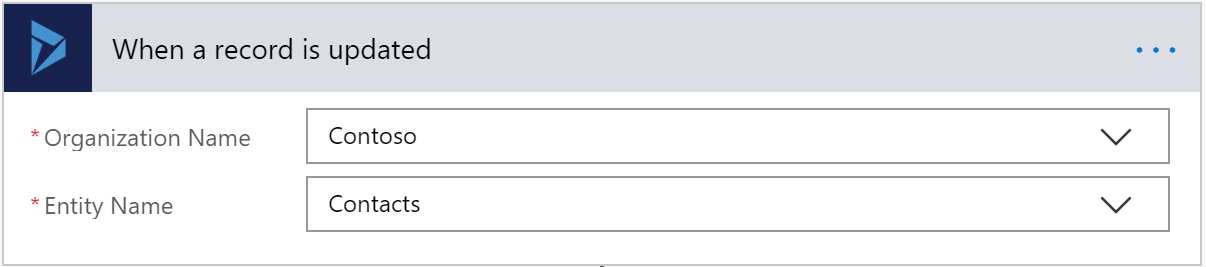
So our trigger (the first step) is when a record is updated. Connect to your organisation and then select the Contacts entity.
So that the flow doesn’t fail frequently, we need to check and make sure the Update Image field is actually set to Yes. Add a condition, and use the Update Image field, is equal to, true.
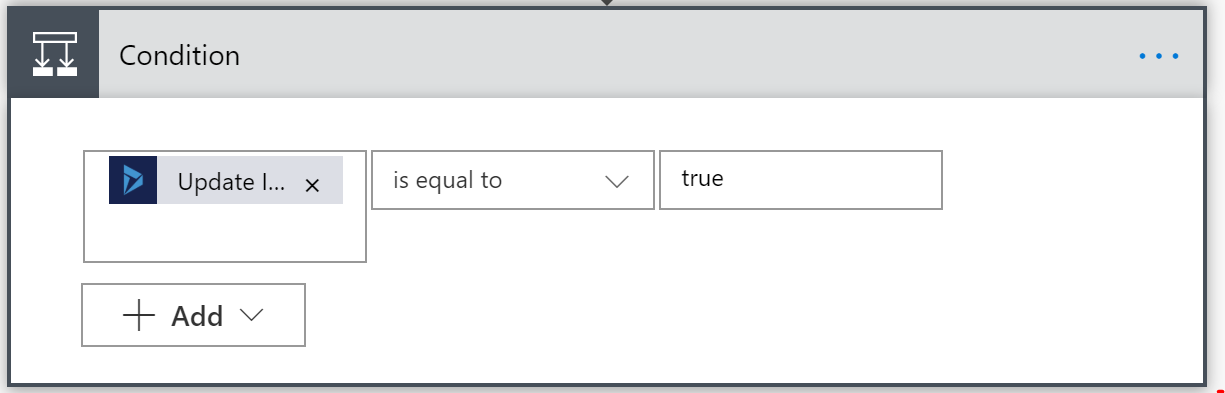
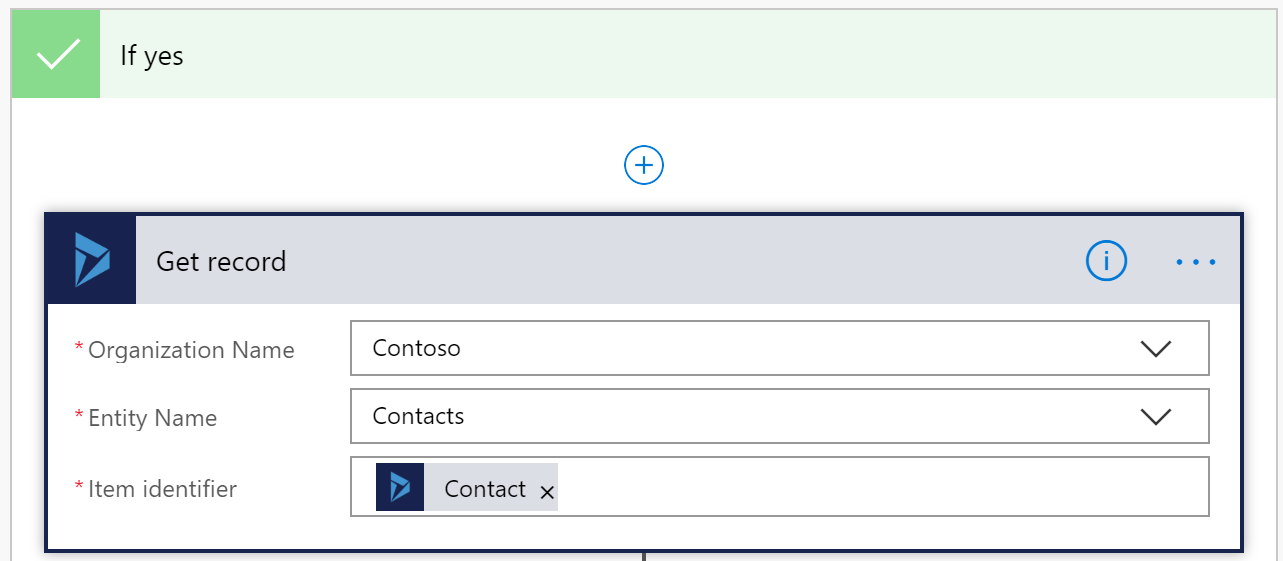
You will end up with two threads, one for If yes, and one for If no. You don’t need to add anything to the no path. If the Update Image field is No, we don’t want anything to happen, so the flow can just end successfully. If Yes, we want to use Get record to get the Contact record that was updated. Connect to the organisation, select the Contact entity, and use the Contact ID as the Item identifier.
Next, use the Twitter connector and select the Get user action. Use the Twitter field from your Get record step above.

Now we need the OneDrive connector and chose the ‘Upload file from URL’ action. The Source URL will be the ‘Profile image url’ from the Get user step. The Destination File Path needs to be folder in OneDrive you wish to add the images to. After the folder name add a forward slash, then use the ‘User name’ field from the Get user step, and add .jpg to the end. You can leave the Overwrite field set to Yes.

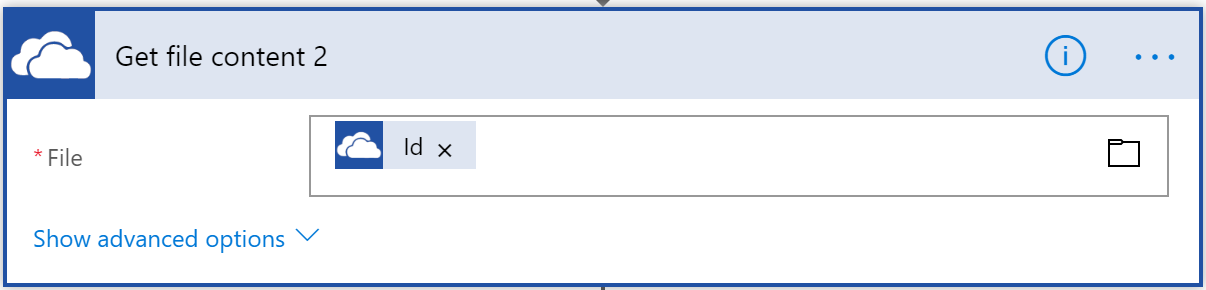
Add another OneDrive action, Get file content. Use the Id from the ‘Upload file from URL’ step to get the file back from OneDrive.
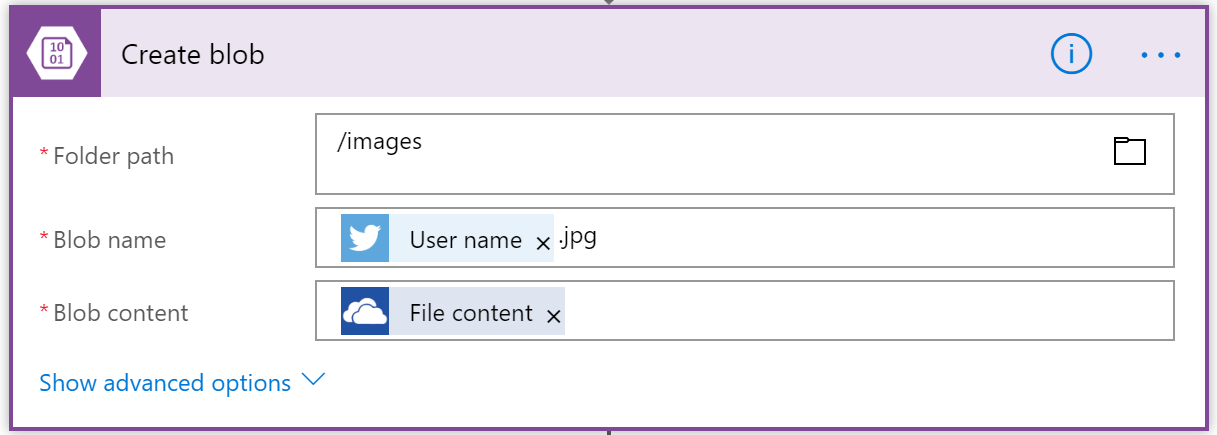
If you haven’t used Azure Blog storage before, it’s well worth looking in to. It’s a fantastic cheaper option to the storage in D365, and a great way to store your documents without increasing the storage limits dramatically in your CRM system. You can find out more information here. Once you have that set up, you can add in a new action and connect to your Azure Blob account and select the ‘Create blob’ action. Add the path to the folder you wish to use in the Folder path field. Set the Blob name using the ‘User name’ field from the Twitter ‘Get user’ step, and add .jpg after it. For the Blob content, use the File content from the ‘Get file content’ from OneDrive. Why didn’t we just go straight from Twitter to Azure Blog storage? There isn’t an option to add the Blob content directly from a URL, so we are using OneDrive as our middle man step.
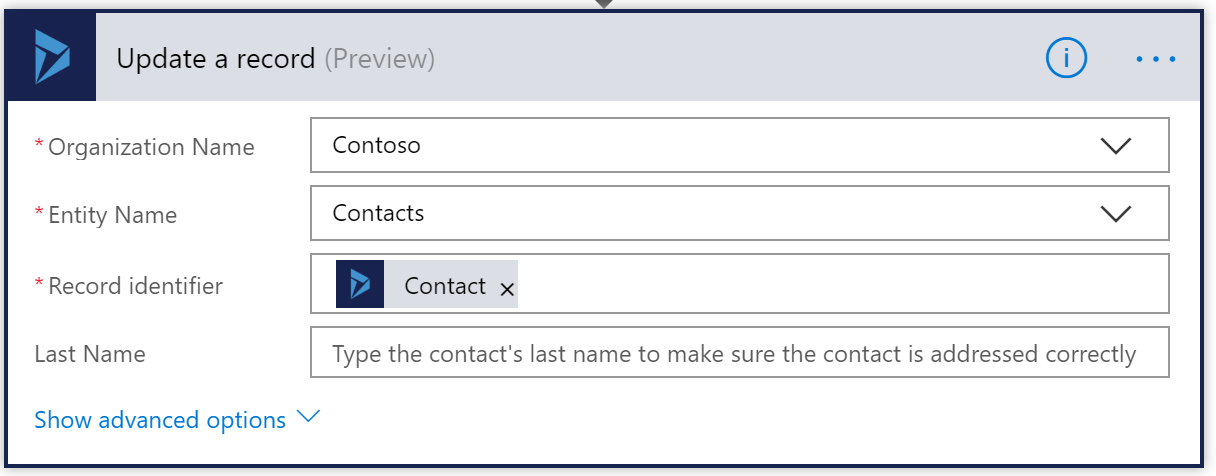
Now we need to update the original Contact record with the Image URL. Add the ‘Update a record’ step using the Dynamics 365 connector. Connect to the organisation, select the Contact entity, and use the Contact ID from the ‘Get record’ step where we grabbed the Contact previously. Click on ‘Show advanced options’ to see all of the other Contact fields.
Scroll down to the Image URL field. Get the full URL link to the folder you used to store the image, then add the ‘Name’ value from the ‘Create blob’ step in the Flow.

Finally, scroll down to the Update Image field, and set it to No. This means that next time the Twitter field is changed on the Contact record in D365, the workflow will trigger again, changing it to Yes, and setting the Microsoft Flow off to run again.

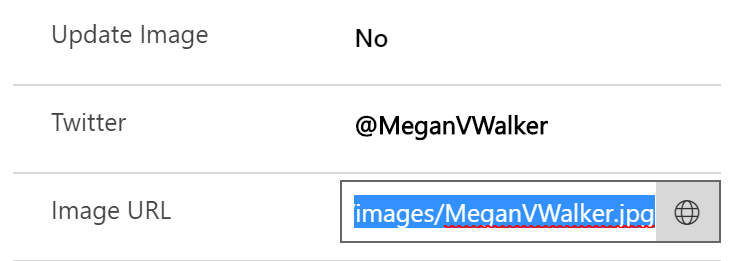
Here we can see a Contact record where the Twitter field was updated, the flow ran and added the Image URL, and changed the Update Image back to No.
Now we can see where we can add the Image URL field to a PowerBI report using the Desktop version, change the Data Category to an ‘Image URL’ so we can actually display the image rather than the url link. This url can now be used elsewhere, such as in a Microsoft Dynamics Portal if required.

Want to just see how to do this? Check out the video below.
Check out the latest post:
Use Custom Event Registration Questions To Branch Your Journeys In Customer Insights
This is just 1 of 603 articles. You can browse through all of them by going to the main blog page, or navigate through different categories to find more content you are interested in. You can also subscribe and get new blog posts emailed to you directly.