*** NOTE: ALL INFORMATION IS ACCURATE AT DATE OF PUBLISHING ***
In another post, I provided an overview of how Satisfaction Metrics are set up and then captured on Surveys and Projects in Customer Voice. Once a survey response is submitted by a respondent, this creates a Customer Voice Survey Response record in the corresponding Common Data Service environment. If Satisfaction Metrics were set up for the survey, the type and values submitted for each metric will be included in the Satisfaction Metric value field on the survey response. In this post, I’ll walk through how to access this information which you can then use to create notifications, update records or take some kind of action based on the values submitted.
There are three types of satisfaction metrics, each with their own possible values.
- sentiment
- negative
- positive
- nps
- promoter
- passive
- detractor
- csat
- rating number – this is not a whole number though, so you won’t be able to use greater than or less than in any condition checks unless you convert to an integer
Using Power Automate, our trigger will be from the current environment Common Data Service connector. Choosing the condition of Create, it will run for the Customer Voice survey responses entity, and the scope of Organisation. If we just leave the trigger like this, it will run for every single survey response regardless of the survey it comes from. To filter it further and only run for a specific survey, click on the ellipsis (three dots) at the top right of the trigger, and then click Settings.

At the bottom of the settings, click to add a new trigger condition. This states that the source survey identifier must equal a specific survey id for it to run.
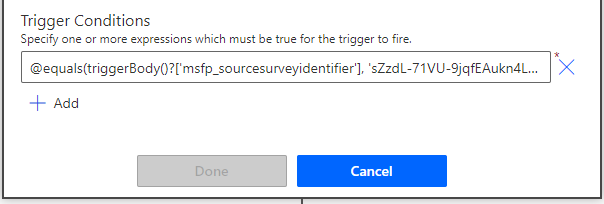
You can use this as the condition, but be sure to replace the ID with the id for your survey. You can get this by opening your survey in Customer Voice and getting it from the top url following FormID= in your browser.
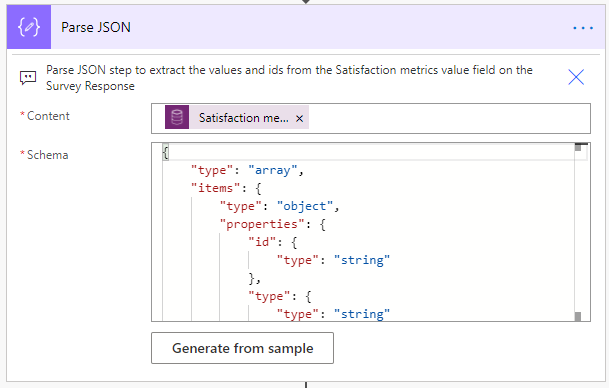
@equals(triggerBody()?['msfp_sourcesurveyidentifier'], 'sZzdL-71VU-9jqfEAukn4L4m8nL7gGRPptWJgekdXoVUOTFNRE1RSEY2TjRTVFBENU9KVEsyM1A3NS4u')Now that we have the trigger, we need to get the satisfaction metric values from the response. We do this using a Parse JSON step. For this step we need to add the JSON schema. This is what the schema looks like. It will get the id, type and value for each of the satisfaction metrics that have been added to the related survey.
{
    "type": "array",
    "items": {
        "type": "object",
        "properties": {
            "id": {
                "type": "string"
            },
            "type": {
                "type": "string"
            },
            "value": {
                "type": "string"
            }
        },
        "required": [
            "id",
            "type",
            "value"
        ]
    }
}
Once you have added the Parse JSON step, use the Satisfaction metric value in the Content field, and click on Generate from sample and paste in the schema above.
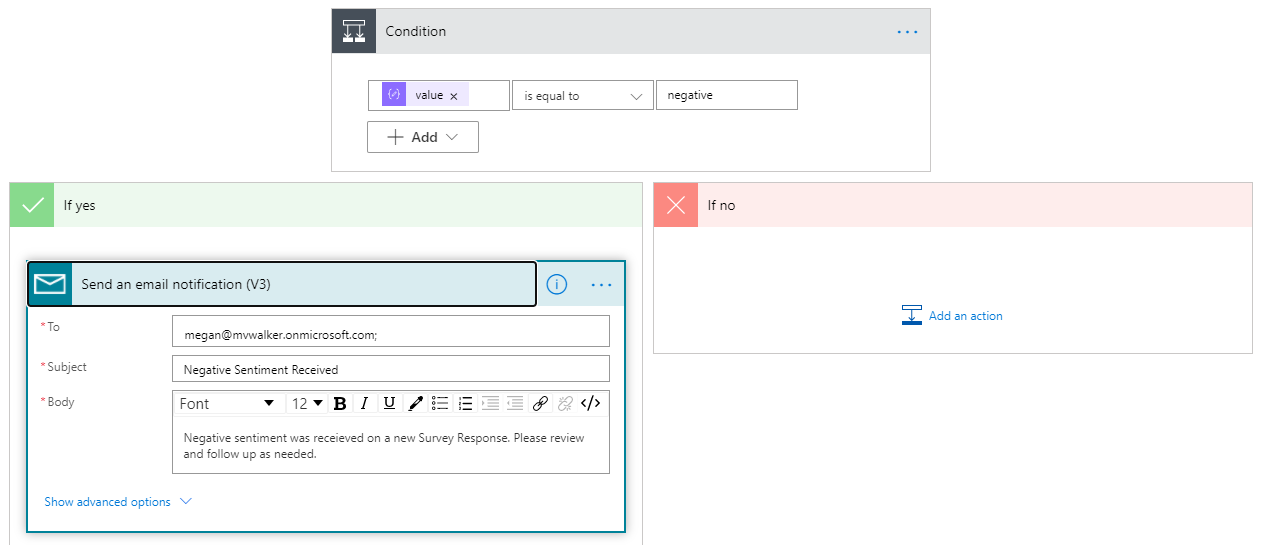
Now let’s go with the simplest scenario first, that we want to send a notification if the sentiment on the survey response is negative. We can add in a Condition step after the Parse JSON step, and use the value to see if it is equal to negative. If it is, we can do whatever is needed, which in this case is just a simple email notification.
Another scenario would be to use the same flow to create actions for each type of satisfaction metric. For this we can use a Switch control, using the type from the Parse JSON step. For each item it finds, it will then go through and check the type and then complete the steps listed. So in the example below, we are stating if the type equals sentiment, we then have a condition to check if it is Negative, and if it is, send our notification email. Then a case if it equals NPS, with a condition to check if it is a detractor, and then send a notification email. Last, of all, a case to check if the type is CSAT, and then a condition to check if it is not a 4 or a 5, and then follow up with a notification email. What you decide to do once you check the condition is of course based on your own specific requirements.

Finally, if you have a survey with multiple satisfaction metrics of the same type, you will need to include the id as part of any condition checks. For example, in a survey, I have two questions that are being used to track sentiment. If I only want to have an action to run for a specific one of those two, I will need to define this. We can then set the condition to be that the value is equal to negative, and then add in that the id is equal to the correct id for the satisfaction metric we want to run our subsequent actions on.

So how do we get access to this ID that is needed? Well, there are a couple of ways you can get this id for the correct metric.
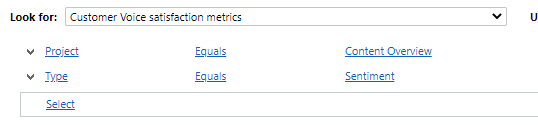
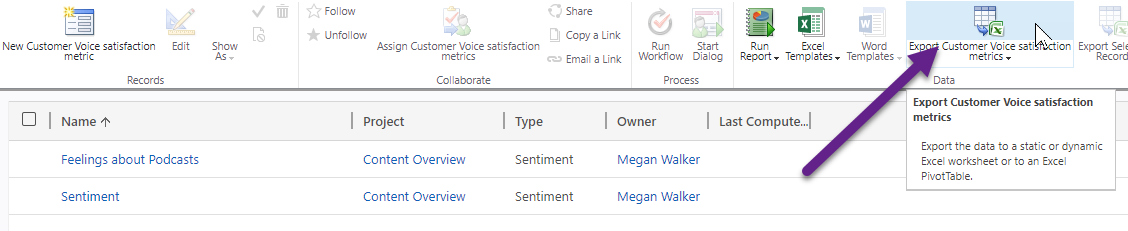
First, if you have access to a model-driven Power App and can access the related Common Data Service entities, you can get this by doing a quick search in Advanced Find. Search for Customer Voice satisfaction metrics, pick the Project that your survey belongs to, and you can also add in the Type if you want to filter further.
You can then run the search, and export the results to Excel.
Once you open them, you’ll need to enable editing, and then show the first few columns that will be hidden. Column A holds the ID that you need.

Another way would be to fill out the survey as a test, then make sure you add the Satisfaction metrics value field to a form in your model-driven Power App.

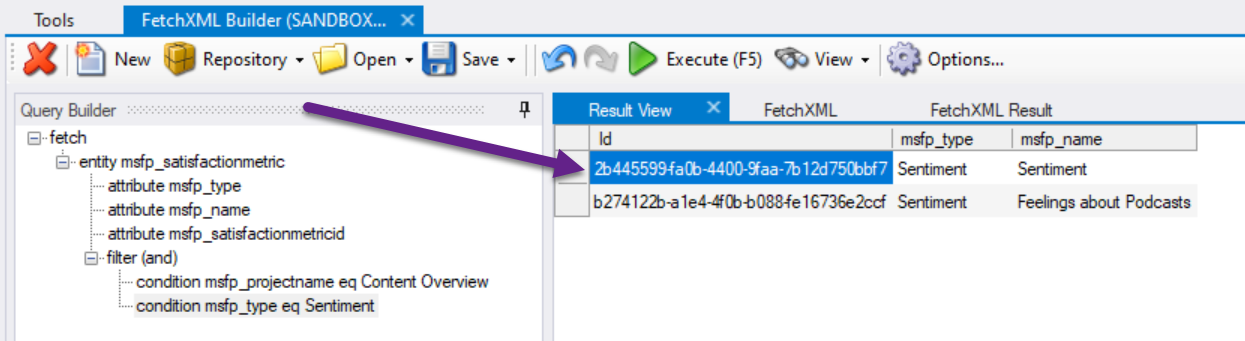
You can then copy the values from here and make sure you pick the correct ID to use. What if you don’t have access to a model-driven Power App? A quick way to get it would be to use the FetchXML Builder created by my friend Jonas Rapp. We can do a simple search to find records for the entity of msfp_satisfactionmetric, filtering by msfp_projectname and msfp_type. Clicking once on the Id to select it, use Ctrl+C on your keyboard, then paste the value into Notepad. You then have the ID you need for your flow.
Finally, you can create your initial flow with just the trigger and the Parse JSON step. Then fill out the survey so it runs. The successful flow will now contain the id’s for all of the satisfaction metrics for the survey which you can then copy and use in a new action step in the flow to filter as needed.

It doesn’t matter which method above you use to get the ID. Once you have it you can use it as needed. You can watch a video on all of this too.
Check out the latest post:
Use Custom Event Registration Questions To Branch Your Journeys In Customer Insights
This is just 1 of 603 articles. You can browse through all of them by going to the main blog page, or navigate through different categories to find more content you are interested in. You can also subscribe and get new blog posts emailed to you directly.
Hi Megan,
One question:
our customer defined the surveys and proceeded with their distribution and the users answered the surveys. Now, the customer has been creating scores for the questions but the customer voice is not updating their metrics. What can / should I do to update the metrics after the surveys have been answered?
Thanks
Helena
Hi Helena, if the custom scores are added AFTER the survey responses are received, there is no mechanism to go back and update to use the new scoring AFTERWARDS. The logic runs when the responses are received. They would need to do something outside of Customer Voice to then apply scoring based on the responses.