*** NOTE: ALL INFORMATION IS ACCURATE AT DATE OF PUBLISHING ***
So far in this series on creating an Events Portal using a Power Page Website we’ve looked at creating an overview of Events, navigating to a single event and registering using one event registration form, displaying details of the event, the event host, and the event speakers. In this post we will look at displaying sessions should your Event have any. Note that this example is based on a one day event with only one track, so if someone registers for the event they have access to all of them. Let’s take a look!
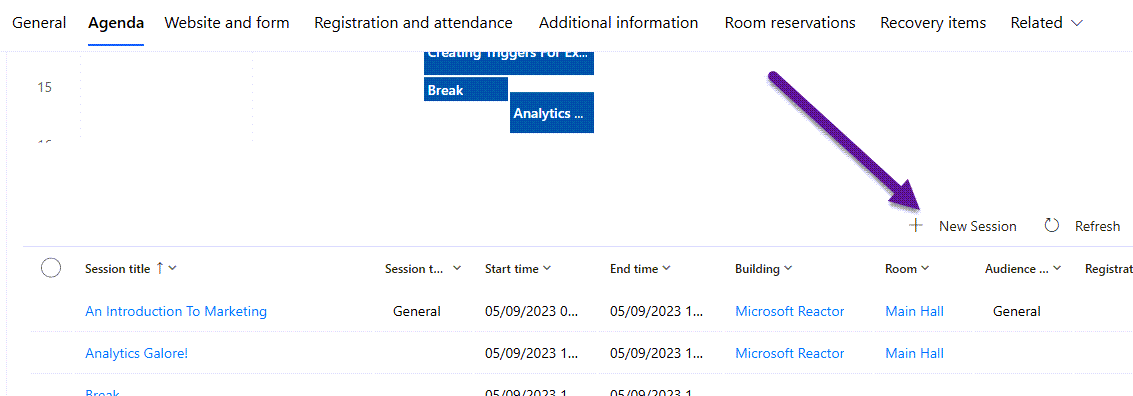
First let’s look at actually adding sessions to an Event. From the Event record in D365 Marketing, click on the Agenda tab, then scroll down to the session section and click the New Session button.
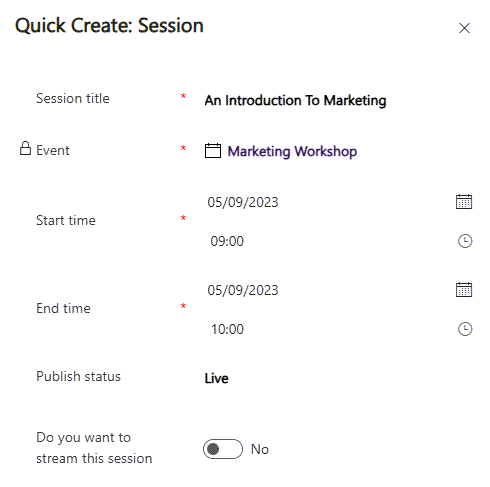
A side panel will open with a Quick Create form for you to add the session. Give it a title, set the start and end time and then determine the status. You can choose to make these live immediately, or set to draft if you need to go back and add more detail.
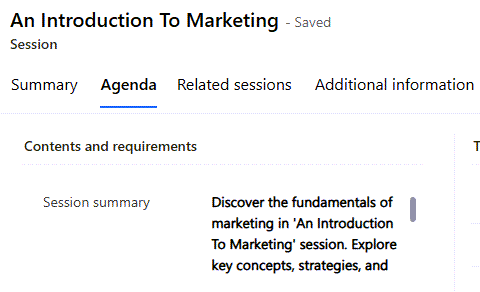
Once you’ve added the Session, you can then click on it from the list on the Agenda tab from the Event, then add more details. In my example I am using the Session summary field from the Session Agenda tab.
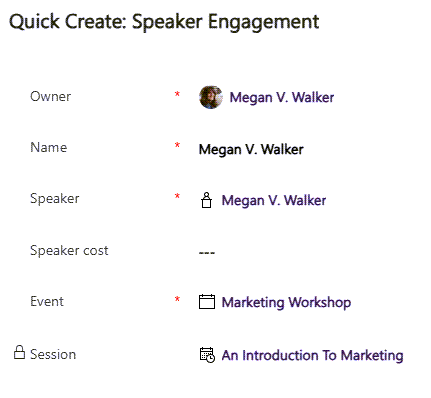
On the same tab you will see a Speaker engagements grid. Click on the New Speaker Engagement button to link this session to a specific Speaker.
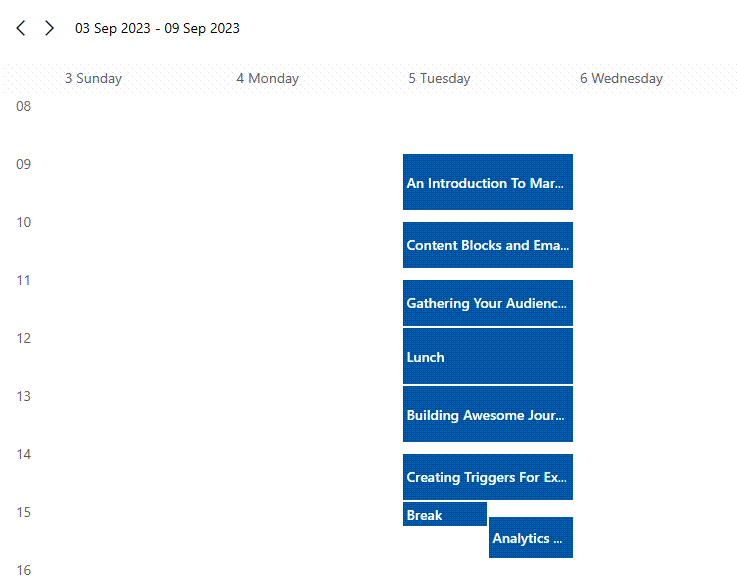
Now you can see all of the sessions from the Event Agenda tab. All set up and ready to go!
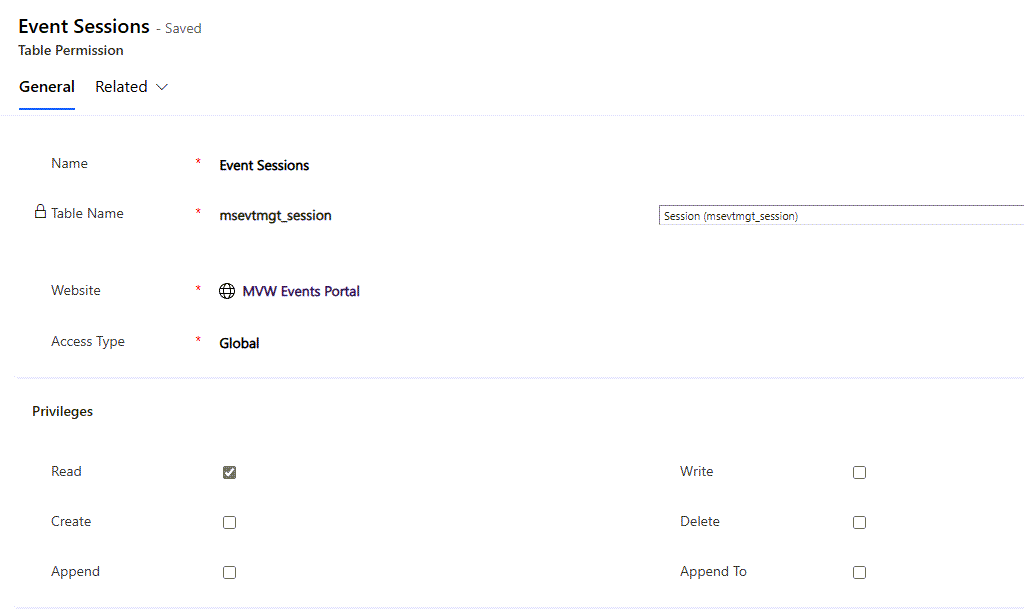
Now on to the portal changes. As with all new kinds of records, we will need a table permission record created to allow people to see the data on the website. Create one for the Session table, make it global and give the read privilege. Link it to the Anonymous Users Web Role for anyone to see the information, or Authenticated Users if only logged in users should be able to see the content.
Now we can add in to our existing Web Template to display an individual Event. The top section needs a new FetchXML query to gather all sessions linked to the Event being viewed. I also only want those Sessions that have a Publish Status of Live. I am also linking through the session back to the speaker engagement record to get the name of the person. Make sure you include the return total record count so that we can make sure we only add in a session section if at least one session exists.
{% fetchxml sessions %}
<fetch version="1.0" output-format="xml-platform" mapping="logical" distinct="true" returntotalrecordcount='true' >
  <entity name="msevtmgt_session">
    <attribute name="msevtmgt_durationmins" />
    <attribute name="msevtmgt_endtime" />
    <attribute name="msevtmgt_name" />
    <attribute name="msevtmgt_sessionsummary" />
    <attribute name="msevtmgt_starttime" />
    <attribute name="msevtmgt_sessionid" />
    <filter>
      <condition attribute="msevtmgt_event" operator="eq" value="{{requestid}}" />
      <condition attribute="msevtmgt_publishstatus" operator="eq" value="100000003" />
    </filter>
    <order attribute="msevtmgt_starttime" />
<link-entity name="msevtmgt_speakerengagement" from="msevtmgt_session" to="msevtmgt_sessionid" link-type="outer" alias="speaker">
      <attribute name="msevtmgt_name" />
    </link-entity>
  </entity>
</fetch>
{% endfetchxml %}
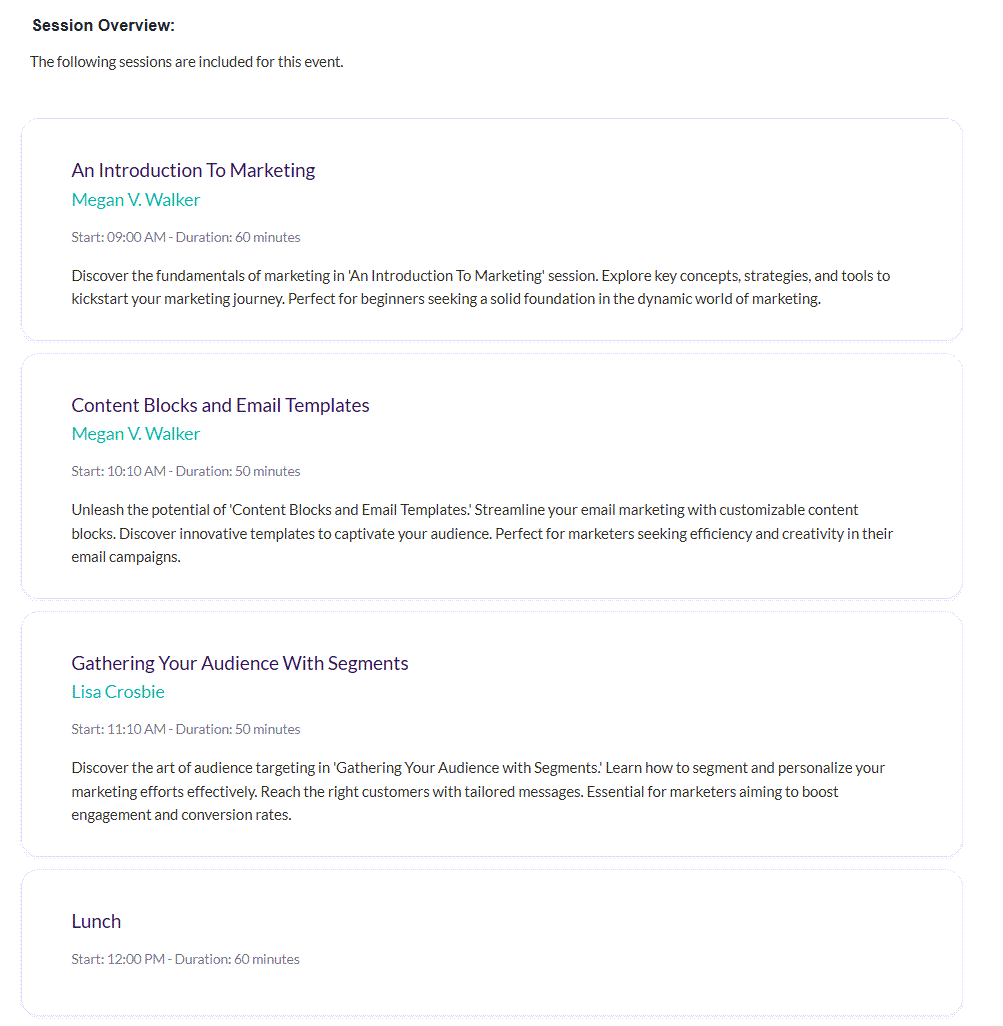
Now we can add the session block wherever you want to display them on the individual event page. So I am checking to make sure the total record count is greater than zero. Then I am including details about the session so we can see the title, the presenter, the start time, duration and summary.
{% if sessions.results.total_record_count > 0 %}
{% block sessions %}
<h3>Session Overview:</h3>
<div class="session-content">The following sessions are included for this event.</div>
<div class="session-grid">
{% for msevtmgt_session in sessions.results.entities %}
<div class="session-item">
<div class="session-details">
<div class="session-title">{{ msevtmgt_session.msevtmgt_name }}</div>
<div class="session-presenter">{{ msevtmgt_session['speaker.msevtmgt_name'] }}</div>
<div class="session-time">Start: {{ msevtmgt_session.msevtmgt_starttime | | date: "HH:mm tt"  }} - Duration: {{ msevtmgt_session.msevtmgt_durationmins }} minutes</div>
<div class="session-summary">{{ msevtmgt_session.msevtmgt_sessionsummary }}</div>
</div>
</div>
{% endfor %}
</div>
 {% endblock %}
{% endif %}
And here you have it! A nice overview of all of the sessions for the event. This is great! BUT this now means there is a LOT of detail on the page, making it pretty long to scroll through to then see the host information and the speaker information. It’s fine if your site just has one event at a time and you can have a completely separate page for the sessions and speakers, but for this we need it all to be on one page.
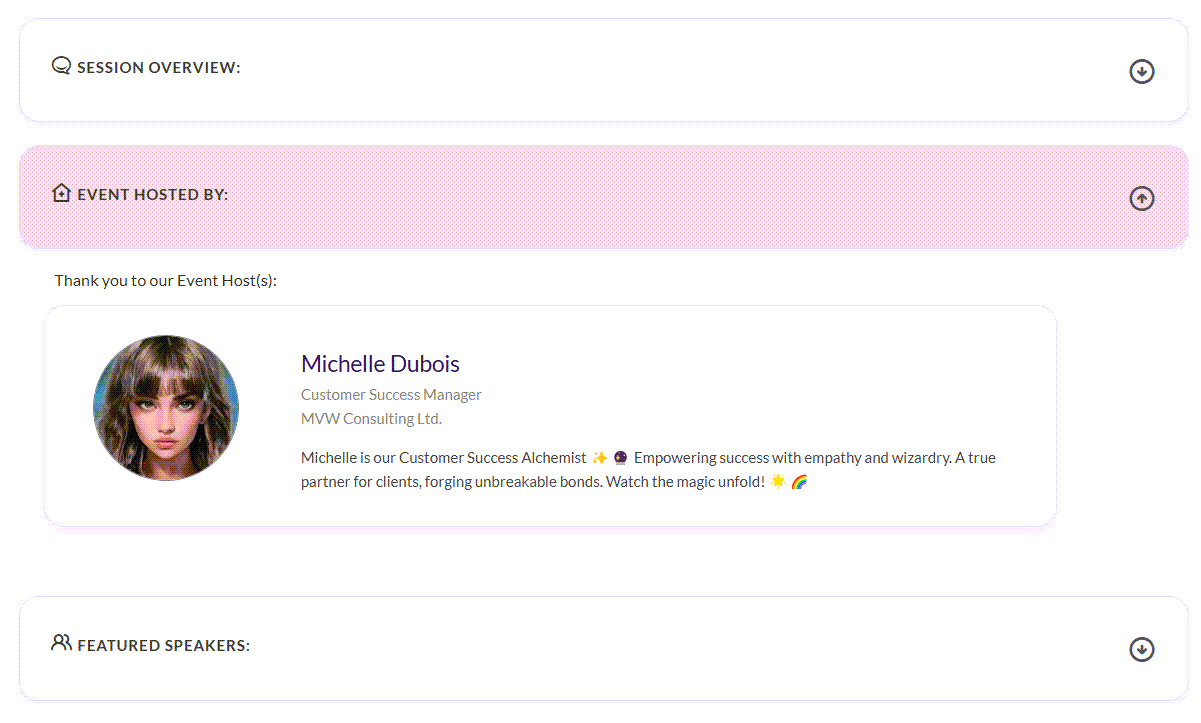
We can easily achieve that by using something called an accordion. This gives us the ability to style a ‘button’ that when pressed will expand a section, then when pressed again will minimise the section. You can do this in many different ways, but for this example I am just adding a button class and using some icons to show a down arrow or up arrow depending on if the section is already expanded. I am including this for each of my three sections (sessions, host and speakers).
{% if sessions.results.total_record_count > 0 %}
   {% block sessions %}
<br><br>
<button class="accordion"><i class="uil uil-hipchat"></i> Session Overview:<i class="uil uil-arrow-circle-down"></i><i class="uil uil-arrow-circle-up"></i></button>
<div class="panel">
<div class="session-content">The following sessions are included for this event.</div>
<div class="session-grid">
{% for msevtmgt_session in sessions.results.entities %}
<div class="session-item">
<div class="session-details">
<div class="session-title">{{ msevtmgt_session.msevtmgt_name }}</div>
<div class="session-presenter">{{ msevtmgt_session['speaker.msevtmgt_name'] }}</div>
<div class="session-time">Start: {{ msevtmgt_session.msevtmgt_starttime | | date: "HH:mm tt"  }} - Duration: {{ msevtmgt_session.msevtmgt_durationmins }} minutes</div>
<div class="session-summary">{{ msevtmgt_session.msevtmgt_sessionsummary }}</div>
</div>
</div>
{% endfor %}
</div>
</div>
 {% endblock %}
{% endif %}
At the very bottom of the Web Template I have added a small script that will make sure the sections get expanded accordingly (no pun intended 😉).
<script>
var acc = document.getElementsByClassName("accordion");
var i;

for (i = 0; i < acc.length; i++) {
  acc[i].addEventListener("click", function() {
    this.classList.toggle("active");
    var panel = this.nextElementSibling;
    if (panel.style.maxHeight) {
      panel.style.maxHeight = null;
    } else {
      panel.style.maxHeight = panel.scrollHeight + "px";
    }
  });
}
</script>
Now you can see the three sections clearly right below the event description and registration form.

Clicking on one section will expand it and change the direction of the arrow.
This is all of the CSS that I used to style the accordion elements.
/* Start Accordian Code */
.accordion {
    background-color: #f7f3fa;
    color: #444;
    cursor: pointer;
    width: 100%;
    text-align: left;
    outline: none;
    font-size: 15px;
    transition: 0.4s;
    box-shadow: 0 2px 2px 2px rgb(58 54 61 / 10%);
    padding: 2em;
    margin: 0em;
    border: 1px solid #dbd7d7;
    border-radius: 20px;
}
.accordion:hover {
    background-color: #e8d7d7;
}
button.accordion:focus {
    background: #eccdcd;
}

.panel {
  padding: 0 18px;
  background-color: white;
  max-height: 0;
  overflow: hidden;
  transition: max-height 0.2s ease-out;
}
i.uil.uil-hipchat {
    font-size: 1.5em;
}
i.uil.uil-clinic-medical {
    font-size: 1.5em;
}
i.uil.uil-user {
    font-size: 1.5em;
}
i.uil.uil-users-alt {
    font-size: 1.5em;
}
i.uil.uil-arrow-circle-down {
    float: right;
    font-size: 2em;
    color: #5a5959;
    display: block;
}
i.uil.uil-arrow-circle-up {
    float: right;
    font-size: 2em;
    color: #5a5959;
    display: none;
}
button.accordion:focus i.uil.uil-arrow-circle-down {
    display: none!important;
}
button.accordion:focus i.uil.uil-arrow-circle-up {
    display: block!important;
}
/* End Accordian Code */
And this is the CSS used for all of the session elements.
.session-grid {
    display: grid;
    grid-template-columns: repeat(1, 1fr);
    grid-gap: 1em;
    padding: 3em 0em 4em 0.5em;
    width: 90%;
}
.session-item {
    box-shadow: 0 2px 2px 2px rgb(58 54 61 / 10%);
    background-color: white;
    padding: 2em;
    margin: 0em;
    border: 1px solid #dbd7d7;
    border-radius: 20px;
}
.session-details {
    width: 96%;
    font-size: 1.2em;
    font-family: 'Lato', sans-serif;
    float: left;
    padding: 1em 0em 0.5em 2em;
}
.session-title {
    color: #3c245c;
    font-size: 1.4em;
}
.session-presenter {
    color: #15b29f;
    font-size: 1.3em;
}
.session-time {
    color: #7c7882;
    font-size: 1em;
	    padding-top: 1em;
}
.session-summary {
    padding-top: 1em;
    font-size: 1.1em;
}
.session-content {
    font-family: 'Lato', sans-serif;
    font-size: 1.3em;
    padding: 1em 1em 0em 1em;
}
I hope this all helps! In another post I will look at providing functionality for a user to ‘favourite’ sessions to flag those they think they might want to go to. That will make it easier for them while at the event and logged in to the portal, and go back to see what sessions they want to go to.
Check out the latest post:
Use Custom Event Registration Questions To Branch Your Journeys In Customer Insights
This is just 1 of 603 articles. You can browse through all of them by going to the main blog page, or navigate through different categories to find more content you are interested in. You can also subscribe and get new blog posts emailed to you directly.
Hi Megan!
Thank you for the post!
One question how do you deal with embedding the registration form for different events on the portal?
What I mean is that as soon as you publish an event in Dynamics marketing an individual „form hosting“ JS snippet will be created for that event .
Is it possible to query this field too with fetch xml?
Best regards,
Mario Neumayer
Hi Mario – check out these two posts that show exactly what to do. You don’t need to pass through different JS scripts for each one, just one script passing through the right variables:
https://meganvwalker.com/generating-an-events-overview-page-web-template/
https://meganvwalker.com/event-page-using-liquid-web-template-events/
Hope that helps!