*** NOTE: ALL INFORMATION IS ACCURATE AT DATE OF PUBLISHING ***
Using the Microsoft Portal that comes with Dynamics 365 CRM just makes sense for any organisation with a customer service or support function. I see more and more companies moving away from a model where clients send emails and moving more towards a fully functioning self service portal. One aspect of the portals that can use a little tweaking is the activities timeline. You can opt to display various activities, but can also create something quite slick and professional just using the comments function. So, how can you go about creating consistent communication using portal comments?
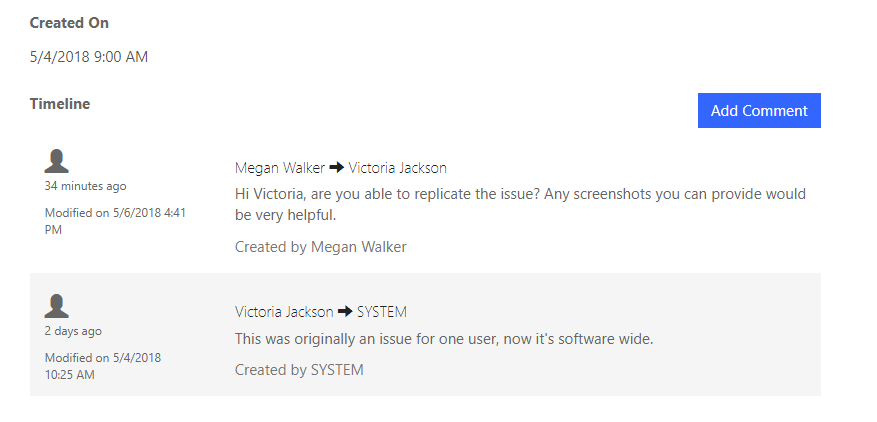
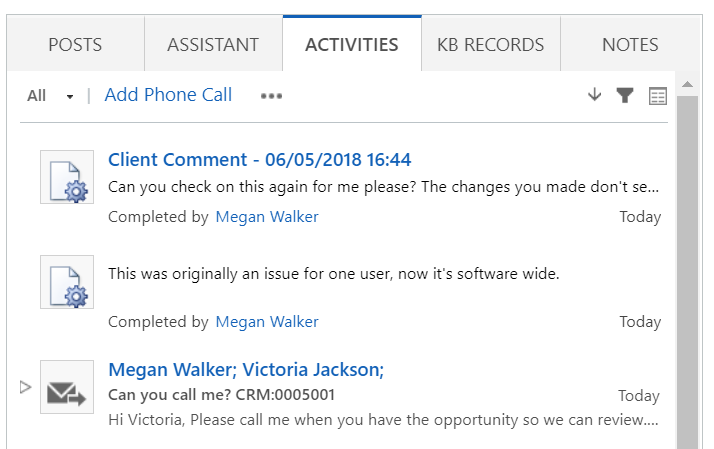
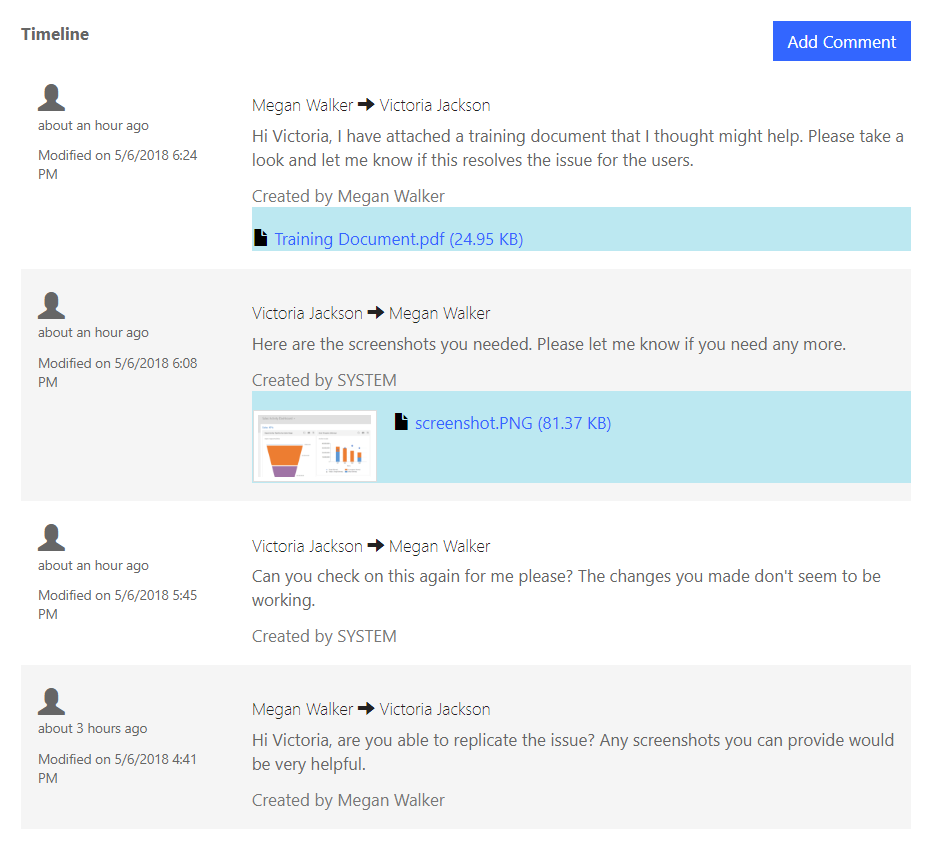
First let’s look at the standard timeline. Each type of activity has a specific icon next to it. Most of them make sense, but the task is an asterisk. Tasks also don’t show anything about who has created it. The portal comment is the one right at the bottom with the person icon. It’s nice and clear and easy to understand, with a clear indicator of who the portal comment was created by, who it was sent to, when, and even better…. if documents are added they will be accessible via the timeline.

So let’s get modifying. First, go to the Activity entity in your solution and find the Portal Timeline View.
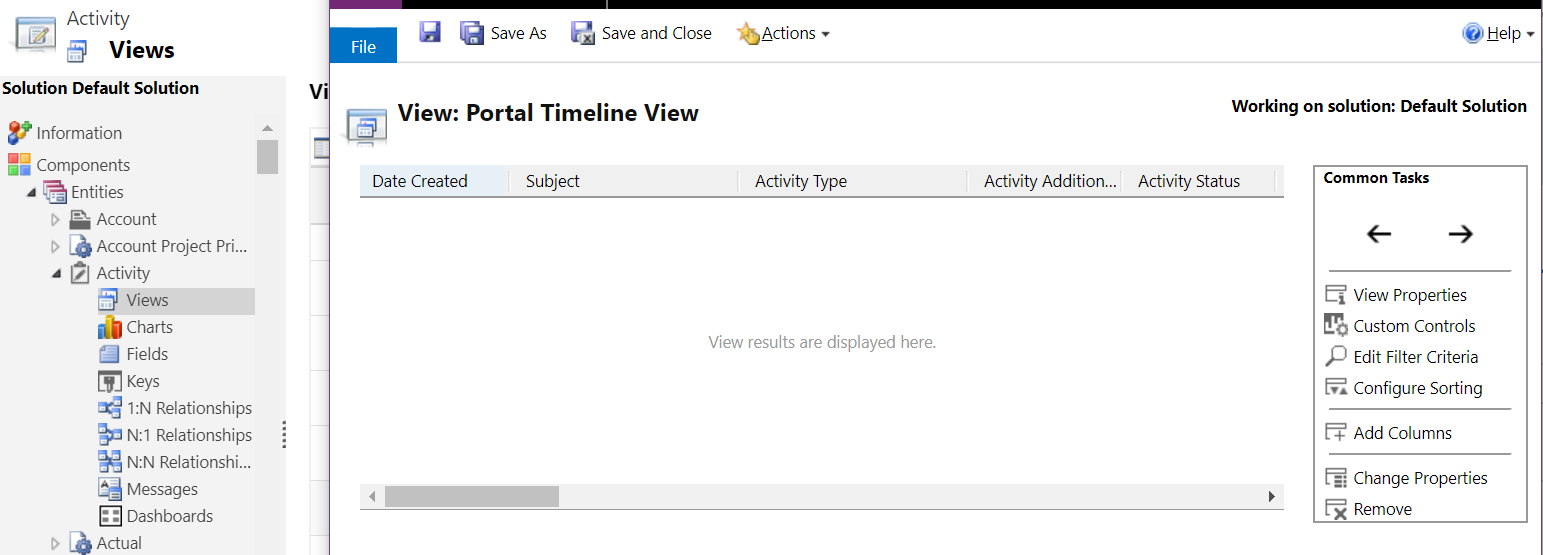
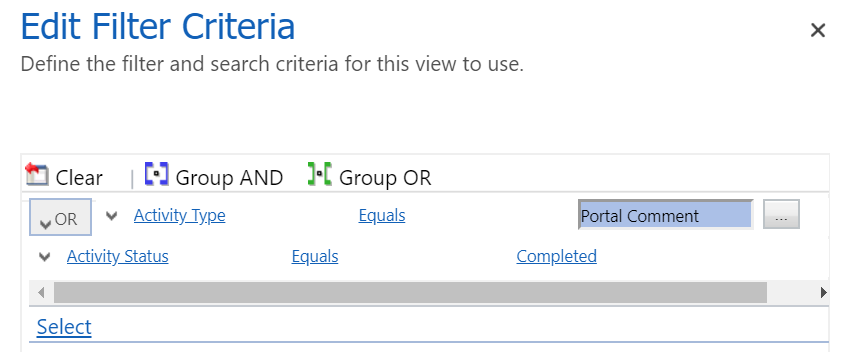
Next, click on Edit Filter Criteria. You can remove all of the other activity types (although if you read through my article about portal comments here you will see this isn’t needed), and make sure you change the Activity Status to Completed. This is important for making sure only the complete portal comments created internally by the case owner will be displayed on the timeline. Consider how adding notes with attachments work, you have to save the record first before you have access to do this, therefore making sure it’s just the complete portal comments that get shown is a good idea.
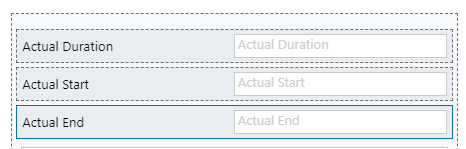
Next, add the following fields to the Portal Comment Main Form. You might want to consider making the Actual Duration a required field. When resolving a case, the total time calculated is based on any completed activities linked to the case. Once you set the Actual Duration and save the record, the Actual Start and Actual End will be populated.
Now go back and confirm you are only seeing Portal Comments (you might need to delete your browser cache first if you are still seeing all other activities).
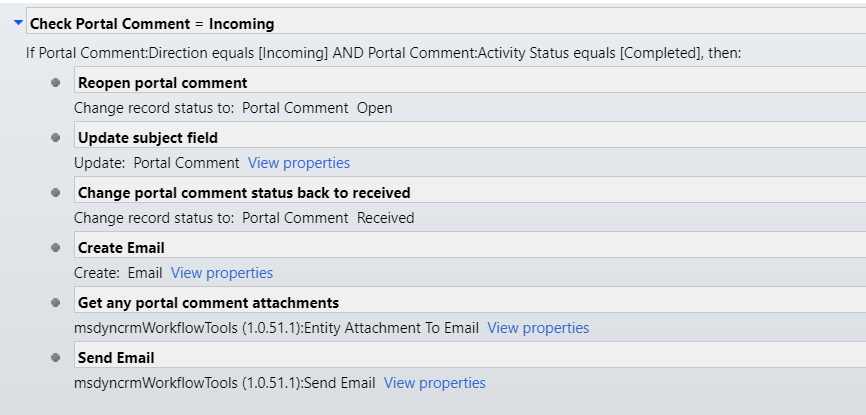
OK, now this next thing is a bit of an annoyance of mine so this isn’t needed, but I think it makes for a better process. When adding the portal comment from the portal itself, your client has no way of adding a subject. This is a required field within CRM, and without it you end up with 100’s of activities without a subject making it harder to find the right ones. So with a workflow we can take care of that. First we will check to make sure the direction of the portal comment is incoming, and that the status equals completed. Next we will change the status and Open the comment so we can edit it. Next, we will update the Portal Comment record and add in something like ‘Client Comment – Date Created’. Finally, we can change the status of the portal comment back to Received.

So now when reviewing the activities thread on the wall is a clear indication that it is a client comment and exactly when it was made. Compare this with the original portal comment and you can see it just looks better!
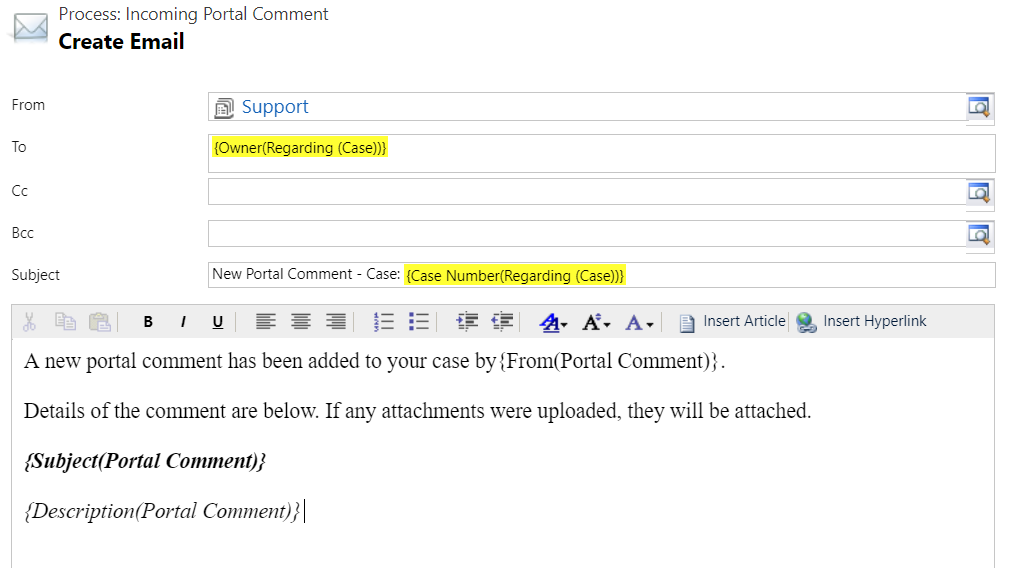
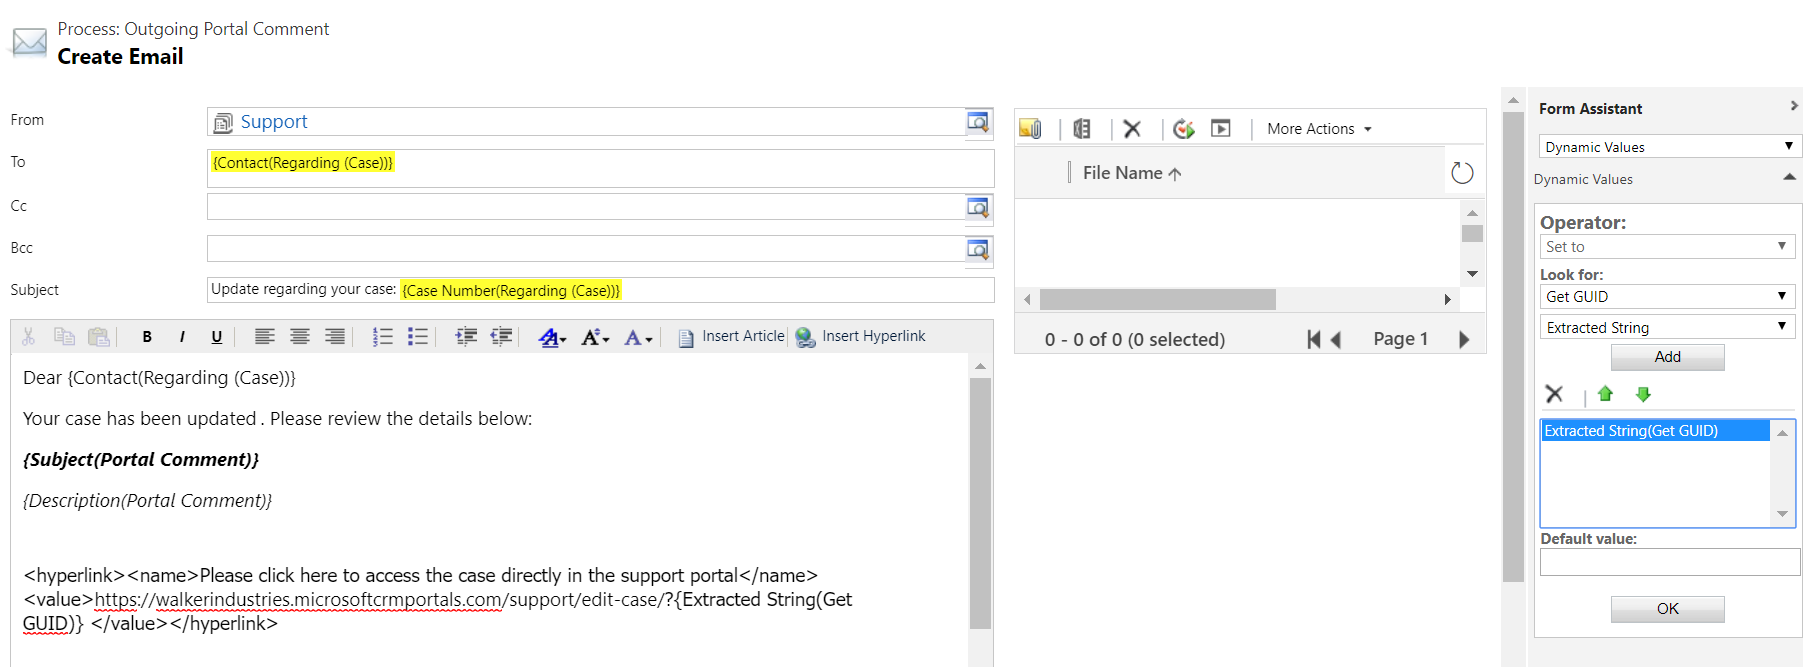
Right, now we will use that same workflow and add a few more steps. By default there is no notification letting the owner of a case know that a new comment has been added via the portal. So we should create one! Quick shout out to my friend Bruce, creator of D365 Notify because you could totally use his solution available in App Source to create pop up notifications. For this article, we are going to use an email notification created via a workflow. Add in a step of Create Email. We want to Create rather than Send so that we can then find any documents that were attached and then send it after that. Use a queue as the From email address. Something like Do Not Reply or Support perhaps. Send the email to the Owner(Regarding (Case)). Add in a relevant subject then pull in fields from the Portal Comment record.
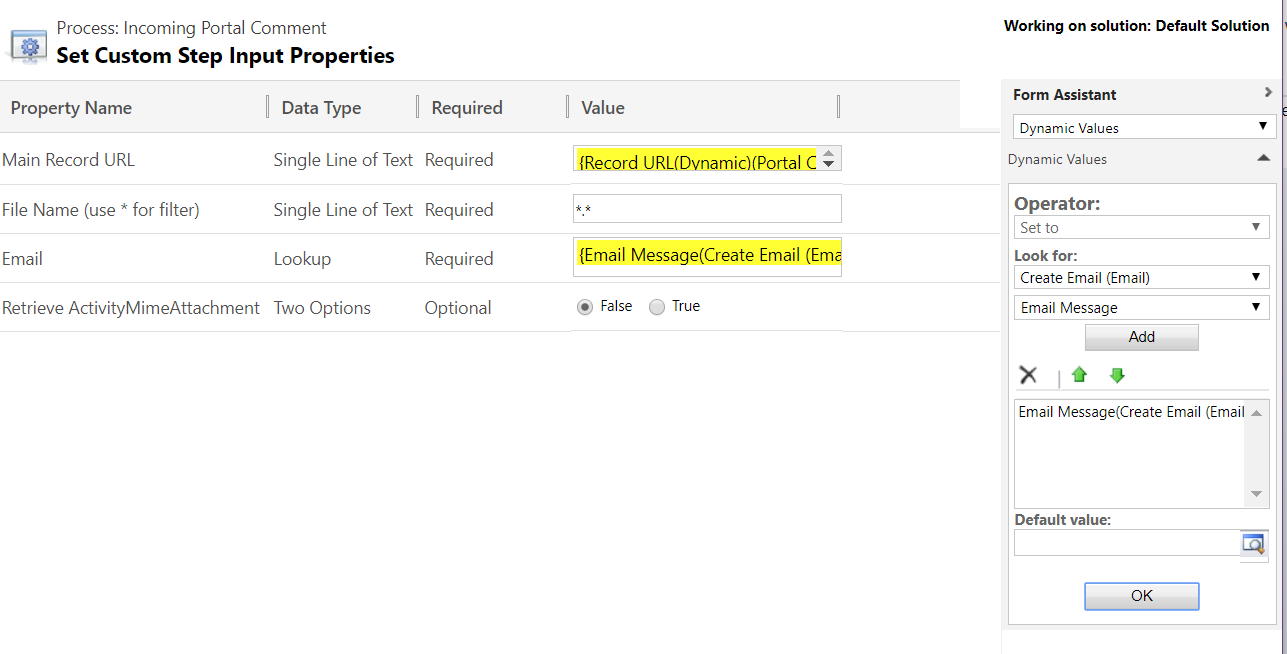
Now these next steps are done using an awesome solution called Dynamics 365 Workflow Tools by MVP Demian Raschkovan. We are going to use the Entity Attachment To Email option first to get any attachments that have been added to the portal comment that the client added. The Main Record URL is the record url of the portal comment. Add *.* to grab all of the files in the File Name field. For Email, click on the drop down Look for list and scroll all the way to the bottom. You should see the Create Email step that you added. Finally, set the last option to False to tell it to look at the Notes section.
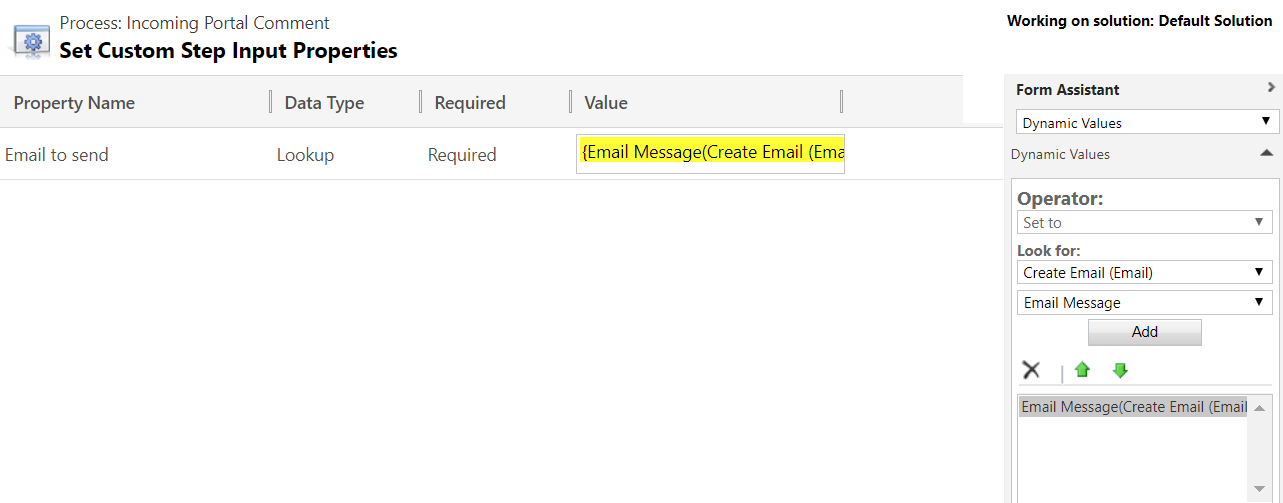
Next we use the Workflow Tools again and pick Send Email.

We look for the Email we created first (scrolling all the way to the bottom of the Look for list) and add it to the value.
So here is the full and finished workflow that will kick off when a client adds a comment via the portal.
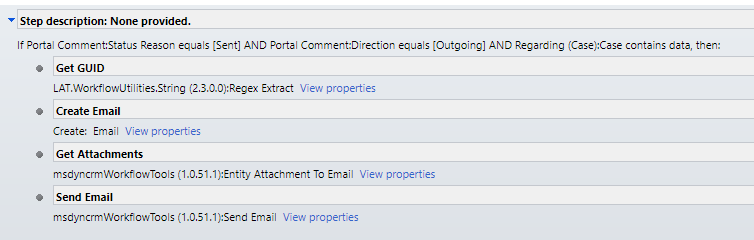
So that’s the internal case owners taken care of. What about when the case owner adds a portal comment via CRM to the case. The client needs to know right? So let’s create a second workflow for Outgoing Comments. This time the status reason should equal sent, portal comment direction equal outgoing and regarding (case) case should contain data. You can see that most of the steps are the same as we set in the first work flow. *EDIT* – Originally I used the Get Record ID but in retesting it didn’t work exactly as planned. While it could still work, I have changed the following steps regarding getting the GUID and using Jason Latimer’s CRM Workflow Utilities solution.
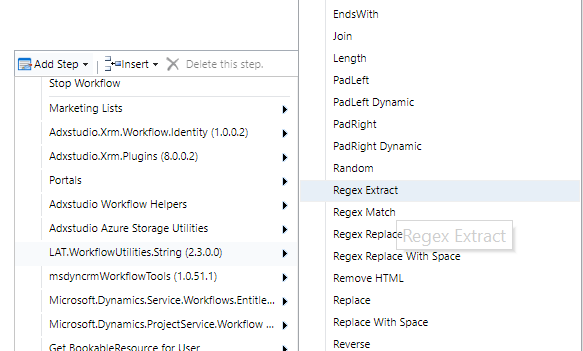
Add a step and pick LAT.WorkflowUtilities.String, then select Regex Extract.
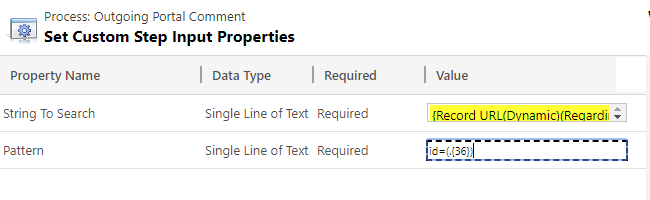
Pull in the Record URL (Dynamic) value, then use id=(.{36}) as the pattern. *End of Edit*
In the Create Email step, add in something like this. This will create a hyperlink to your portal. After the ? you need to add in the extracted string from your Get GUID step above. This will append the case GUID to the end of your portal URL, taking them to the edit case page.
<hyperlink><name>Please click here to access the case directly in the support portal</name><value>https://yourportalURL.microsoftcrmportals.com/support/edit-case/?{Extracted String(Get GUID)} </value></hyperlink>
Finally, either add in one workflow to delete the emails that you are sending, or add in logic at the end of your other workflows. You are using CRM as the mechanism to send the alerts but really don’t need to keep those email activities that aren’t linked to anything. Start the workflow when the email record is created, then add your conditions to check the email has come from your queue and that the email regarding field is empty. Wait until the email is sent, then wait 5 mins before deleting the email. The Delete Record option is also part of the Workflow Tools solution.

That’s it! Well, a few steps, I agree, but working through this then provides a nice clear timeline in the portal.
- Your CRM users only need to remember to create and mark complete one type of activity.
- Their time is tracked against the case.
- They get notifications each time the client adds a comment.
- The client gets a notification when the case owner (or any other user) adds a portal comment within CRM.
- Documents are attached to the email notifications
- Your notifications are cleaned up and not stored in CRM
- It looks pretty awesome!
What other modifications have you made to the portal to make it work in a way that works for your organisation?
Check out the latest post:
Using The Pipeline View To Manage Your Opportunities
This is just 1 of 452 articles. You can browse through all of them by going to the main blog page, or navigate through different categories to find more content you are interested in. You can also subscribe and get new blog posts emailed to you directly.
Hi Megan,
Awesome article!!!
As mentioned I can’t figure out how you are getting the entity form to display the record. Bruce and I had a play. I can get it to work the way I know by including after the webpage url /?id=GUID. Url/?GUID doesn’t work for me. Any clues?
Also! I love the timeline view but any thoughts on how we can get rid of the “Created by SYSTEM” bit? I don’t think it adds any value to the user, if anything it will just confuse them.
Cheers,
Lachlan
Hi Lachlan, I went through and tested it again. And it didn’t work for me either. I had originally created this using a different solution which had worked, but I hadn’t retested it using the ‘Get Record ID’ from Dynamics 365 Workflow Tools. I am sure there is a way to get it to work, but I have edited the post to include the method I originally used and I can confirm 100% works, and that is using part of a solution by Jason Latimer (link is in the post). Sorry for any confusion!
Hi Megan. Thank you for a good and useful guide.
As Lachlan mentioned the “created by” does not provide a lot of value for the user and for me the same goes with “modified on”. Do you know any solution to remove these from the view?
Best Regards,
Casper
Hi Casper,
Thanks for the comment! As far as I know, there isn’t a way to change or hide those things based on how the timeline works. You don’t have the option to edit the timeline functionality at this point which is a shame.
Hi Casper
I was able to “hide” the “Created by” and “Modified on” using custom CSS.
.entity-timeline .notes .note .row .header .modifiedon {
display: none;
}
.entity-timeline .notes .note .createdby {
display: none;
}
I have an app.css file with all my customization’s and include this in every page using the “Head/Bottom” content snippet.
I assume my response is a little late for you but my be useful to the next person reading this.
Nice, thanks Mark! It’s great when others share how they have resolved an issue, so thanks for sharing for them to see!
Hi Megan,
Thanks for this great article!
I just want to add something. What if the client replies our notification email? I think we should create a new portal comment from the clients email, change the case status and notify the team.
Absolutely you could add that in, however, if you wanted to force a scenario of making all communications via the portal, I would suggest emailing comments to the client from a ‘do not reply’ email address. So if the client then responded to that, if you then follow back up on it, you’ve educated the client that your do not reply doesn’t actually mean anything. If you always respond, they will always email you. So it’s more about your internal process more than anything else. It’s all about what you want to achieve in how your portal is used.
First of all, great and helpful article (as always when it comes to you I would say!)
I have one question. Do you know any way to show the subject field in the timeline in the portal? Or is it still not that customizable (except hiding things with custom CSS)?
Why thank you ???? No, just like the timeline within a model-driven app, you have no way to adjust the timeline… other than like you said, to hide things with CSS.