*** NOTE: ALL INFORMATION IS ACCURATE AT DATE OF PUBLISHING ***
Organisations who wish to embrace text or SMS marketing can do so using D365 Marketing. There are several service provider options available out of the box (TeleSign, Twilio, Azure SMS for some regions). You can watch one of the videos from my A to Z of Real-time Marketing that covers delivering text messages for more information. Initially, the only way to allow someone to opt in to get text messages was if you were using the default compliance page. The much-needed introduction of using outbound subscription centres in real-time marketing was fantastic, but this then left a gap for texting. How do you ask Contacts if they would like to get texts, and then manage them opting back out again? Let’s take a look at one way you can manage Text Message Subscriptions.
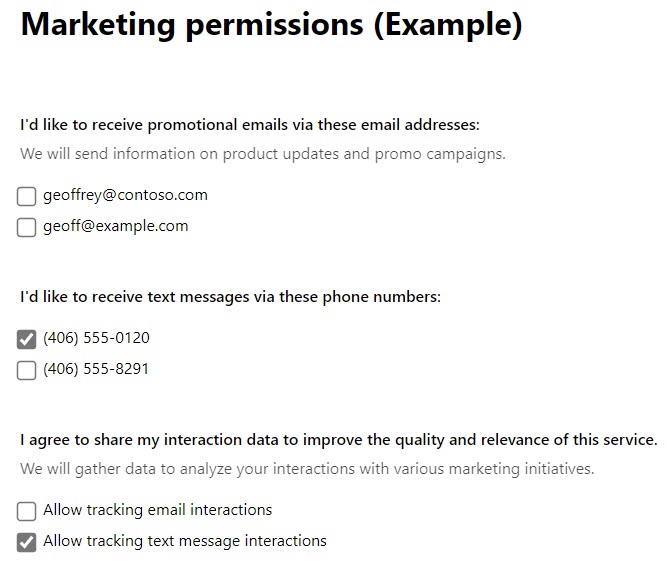
In case you were unsure, this is what the default permissions page looks like for Real-time Marketing. It’s not pretty, and Outbound Subscription centres provide WAY more possibilities. So we will leave this for now. Understand that if someone were to interact with the default permissions page and tick the box to receive text messages and allow tracking of text message interactions, two Contact Point Consent records would be created for the phone number. They are linked specifically to the number rather than the Contact record.
D365 Configuration Changes
If we want to use our own subscription centre, or provide the ability for a Contact to opt in and out of getting text messages on any form, we need to add a few new fields first. There is a standard out of the box Mobile Phone field which is used by most organisations. We will continue to use this on the Contact form and have it be the number used when sending out texts, but we want to make sure we collect mobile phone numbers in the right format. When sending text messages, especially when you could have Contacts in different countries, we need to make sure we have the Country Code and get the number formatted correctly. The out of the box mobile phone field can have anything typed in there, and likely will be populated with all kinds of things in your organisations environment so this way we are starting fresh. You could still just use the Mobile Phone filed on forms, but this relies heavily on the person filling out the form to complete it just the way you need with a country code and without adding brackets or dashes or anything else in there.
I’ve added the following new fields. The Marketing Mobile field is just a single line text field with the data type of phone number.

The Marketing Mobile Country Code field is a Choice (option set) field that I mapped to a new global Choice field called Country Code. In this field you will add all of the different country codes that you would send text messages to.

Then we add in the Send Text Messages field. I’ve created it in the same way the other marketing related fields work. Value 1 is mapped to Do Not Allow and value 0 is mapped to Allow. It makes sense to set the default as Do Not Allow as you want to make sure people are actually opting in themselves to get text messages from you.

I’ve then added all new three fields along with the default Mobile Phone number field to a Text Messages section on a Contact form.

D365 Marketing Form Fields
Now we need to map these new fields in some marketing form fields. For the first one, I’ve used the out of the box mobile phone form field and mapped it to my new Marketing Mobile field.

I’ve mapped the Marketing Mobile Country Code field.

And then mapped the two-options field type to the new Send Text Messages field and set it to show as a checkbox.

I’ve then added the three mapped fields to a form that I want to use and allow someone to opt in or out of text messages. When they tick or untick the box for sending text messages, this is what will determine what happens next to the related Contacts record.

Flow in Power Automate
The trigger for our flow in Power Automate is when a Contact record is modified, and it’s the new Send Text Messages field that should be used in the Select columns section. This means the flow will only run when it’s this field that is changed. So, consider a Contact filling out a Marketing Form and ticking or unticking the box for Send Text Messages, then the flow will run.

Now we will add in a variable using the initialise variable action. This will be used to format and store a mobile phone number in later. Set the Type as String.

Next we have another initialise variable step but we are also going to set a value at the same time. We will look at the Send Text Message field and see if it is true or false. True is 1 and false is 0 in terms of the values, so if you did the same as me, True is Do Not Allow and False is Allow. We are then going to set a value to determine if the Contact Point Consent record should equate to Opted In or Opted Out. Our expression below is saying, if the value of the Send Text Message field is False (Allow), use value 534120001 which equals Opted In, otherwise use 534120002 which equals Opted Out. We will then use this variable several times throughout the flow to set the correct value on the Contact Point Consent records. Make sure you change the mvw_ prefix to whatever prefix you have in your own environment.
@{if(equals(triggerOutputs()?['body/mvw_sendtextmessages'], false),534120001,534120002)}

Now we are going to check to see if the Country Code field has a value. For this, it really depends on what forms you are going to use your new fields on, and if you are going to allow a user to update the Send Text Messages field or not. You could also check to see if the Marketing Mobile field has a value, depends on your own requirements. I’ve checked to make sure it’s not equal to null.

If that condition is met, we go down the Yes branch of the condition. Add a set variable action step. We then need to format the mobile number to add in the Country Code first, and then the mobile number. This means we want the label from the Choice field, not the value. To do this we can paste this (change the prefix to match your own) into the value.
@{triggerOutputs()?['body/_mvw_marketingmobilecountrycode_label']}
Right after that, add in an expression. Again, change the prefix, and use this replace expression. This will strip out any spaces in the number so it’s formatted correctly for sending a text.
@{replace(triggerOutputs()?['body/mvw_marketingmobile'],' ','')}

Then on the Yes branch add another action of Update a row from the Dataverse connector. Look for the Contacts table and then use the Contact id from the initial trigger for the Row ID.

Find the out of the box Mobile Phone number field and add in the variable you created that is storing the formatted mobile number.

Now we go down the No path. Use the same step that you did in the Yes path for set variable, but this time we are going to take the value from the Mobile Number and format it to remove spaces. If there is no Country Code we can’t add it first, and we will not update it back on to the Contact record. Again, figure out your own requirements, but my feeling would be if there is no Country Code, perhaps it was a user who changed this, so let’s not make changes to the record. This is expression I have used here.
@{replace(triggerOutputs()?['body/mobilephone'],' ','')}

Now minimise your Condition section so you aren’t adding your next step to either the Yes or No Branch and add a List rows action. Look for the table name of Contact Point Consent. Yay! There are 4 of them…. 😯. It should be the second one that you need.

Once you have selected it, you can do a quick check by clicking on the ellipsis (3 dots) to get to the menu on the List rows step, then click on Peek code.
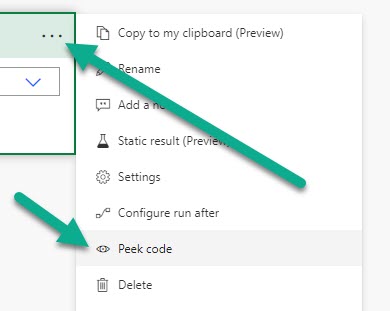
You should see that the entity name has the number 2 in it at the end. That’s the right one.

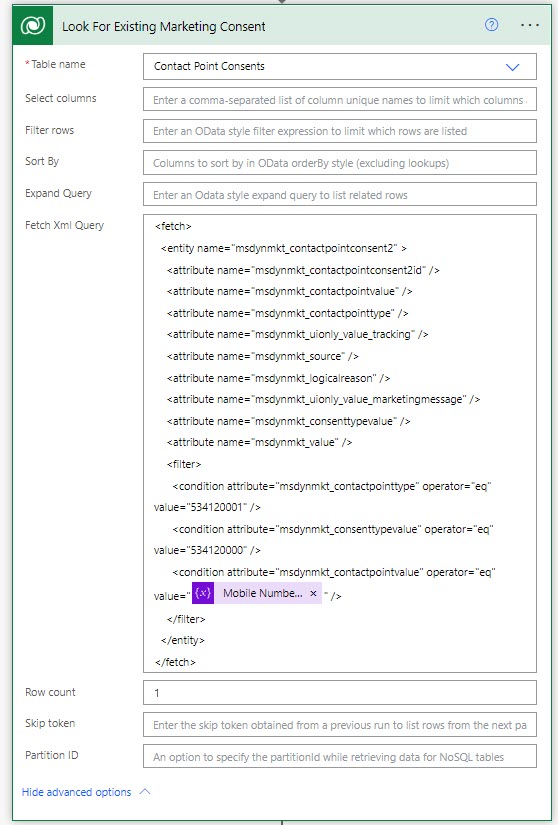
Then we will add in a Fetch Xml Query. Although you don’t need all of the attributes in there, originally I didn’t have any and was getting errors due to a removed field (removed by Microsoft). So add them in just to make sure, then you should be fine. What IS important are the three filter conditions. The msdynmkt_contactpointtype of 534120001 is for Text Message. The msdynmkt_consenttypevalue of 534120000 is for Marketing Communication, meaning are you even allowed to text this Contact. Then the msdynmkt_contactpointvalue is the actual mobile phone number where you will add in your variable that contains your formatted number. You want to see if a Contact Point Consent record for Marketing Communication even exists.
<fetch>
  <entity name="msdynmkt_contactpointconsent2" >
    <attribute name="msdynmkt_contactpointconsent2id" />
    <attribute name="msdynmkt_contactpointvalue" />
    <attribute name="msdynmkt_contactpointtype" />
    <attribute name="msdynmkt_uionly_value_tracking" />
    <attribute name="msdynmkt_source" />
    <attribute name="msdynmkt_logicalreason" />
    <attribute name="msdynmkt_uionly_value_marketingmessage" />
    <attribute name="msdynmkt_consenttypevalue" />
    <attribute name="msdynmkt_value" />
    <filter>
      <condition attribute="msdynmkt_contactpointtype" operator="eq" value="534120001" />
      <condition attribute="msdynmkt_consenttypevalue" operator="eq" value="534120000" />
      <condition attribute="msdynmkt_contactpointvalue" operator="eq" value="@{variables('Mobile Number No Spaces')}" />
    </filter>
  </entity>
</fetch>
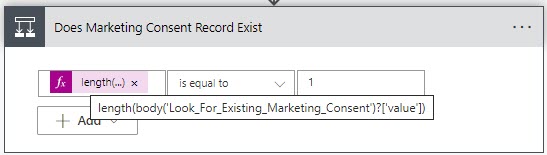
Now we add in a Condition. You can use the expression below (change it to the name you used for your List rows step if different) to check how many rows were returned and check if it is equal to 1.
length(body('Look_For_Existing_Marketing_Consent')?['value'])
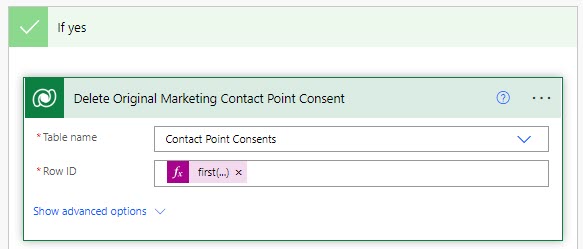
We will only add something to the Yes branch, and in this case we will delete the record. Why delete? Well, if we already have one, we cannot update it without indicating that it was deleted internally. There is a Source field (which cannot be added to or edited) that allows us to set it was updated via the preference centre. However, this can only be set upon creation of the Contact Point Consent record, not via an Update of the record. If we delete the existing one, we can then create a new one. Again, consider your own requirements, and do you need some kind of way to check to see if the update was made by the Contact or by a User? Then configure your flow accordingly.
The following expression will get the first record that was found and remove it. Using this approach rather than searching for the Contact Point Consent value means we can avoid getting an Apply to each loop going on. Much neater!
@{first(body('Look_For_Existing_Marketing_Consent')?['value'])?['msdynmkt_contactpointconsent2id']}
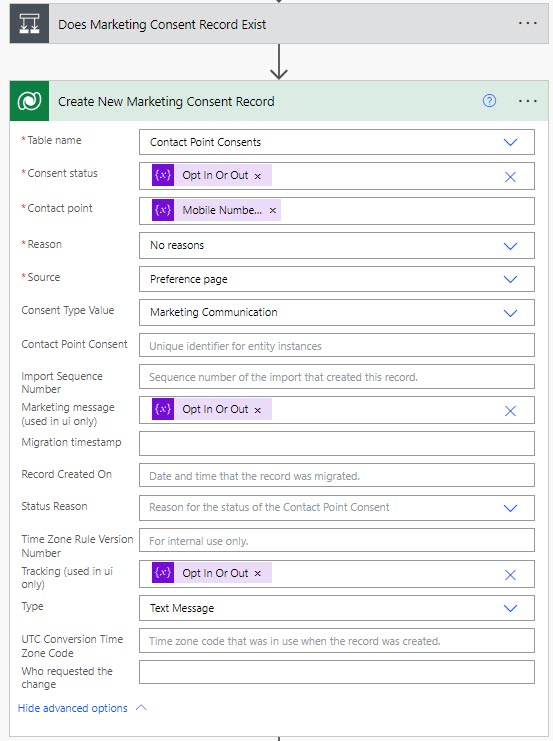
Now minimise that condition section and use Add a new row action and select Contact Point Consents (again picking the 2nd one from the dropdown list). Where the Opt In Or Out variable has been used, this can be added by clicking on the dropdown, then choosing Enter custom value, then adding the variable created at the start of the flow. Be sure to set the Reason, Source, Consent Type Value and Type. The Consent Type Value should be Marketing Communication and the Type should be Text Message.
The next steps are pretty much a replication of the ones above. This time we are looking for Tracking Consent records. Be sure to consult your legal team (or representative) on this one. You should include some text or a link to your tracking and privacy policy so when someone fills out a form they are aware that by doing so they are consenting to tracking or whatever else is occurring on your website. Assuming you have done this, you should be OK to create a Contact Point Consent record for Tracking being allowed. However, I am not a lawyer, so this is for you to figure out the right approach for your organisation, industry and country. Add in another List rows step. The Fetch XML Query is exactly the same as above apart from the value for the msdynmkt_consenttypevalue which is 534120001 instead of 534120000 which equates to Tracking instead of Marketing Communication.
Another Condition is needed to check to see how many tracking consent records were found. Then another Delete row step on the Yes path to remove the existing record if one was found. You can use this for the Condition expression (change it based on the name of your List rows step).
length(body('Look_For_Existing_Tracking_Consent')?['value'])
Then use this as the expression in the Row ID for getting the first Contact Point Consent record that was found.
@{first(body('Look_For_Existing_Tracking_Consent')?['value'])?['msdynmkt_contactpointconsent2id']}
Then minimise the Condition block so you don’t add anything more to the Yes or No paths. Then use the Add a row step to create the new Contact Point Consents records just as was done for the Marketing Communication. This time make sure the Consent Type Value is set to Tracking.
Contact Point Consent Records
Now fill out a Marketing Form (or fill out all of your new fields and make sure Send Text Messages is Allow). The flow should run and create two new Contact Point Consent records and set them both to Opted In. If you then change the Send Text Messages to Do Not Allow, it will run again and set the Consent status to Opted Out instead.

We can see on the Contact record that the Mobile Phone number field now matches the number on the Contact Point Consent record.

Check out the latest post:
Use Custom Event Registration Questions To Branch Your Journeys In Customer Insights
This is just 1 of 603 articles. You can browse through all of them by going to the main blog page, or navigate through different categories to find more content you are interested in.
Hi Megan,
thanks for the amazing content you put out in the community!
When I’m initializing the second variable using an expression you provided, I’m getting an “expression is invalid” error.
@{if(equals(triggerOutputs()?[‘body/cr937_SendTextMessage’], false),534120001,534120002)}
cr937_SendTextMessage is the logical name of my variable.
Could you please suggest how to proceed further?
thanks
Hi Nitish, are you trying to paste it into the expression? If so, you would need to remove the @{ from the start and the } from the end. So paste this in as the expression instead.
if(equals(triggerOutputs()?[‘body/cr937_SendTextMessage’], false),534120001,534120002)If you paste directly into the value field on the variable, then you can paste exactly as I have. That should hopefully work for you.
Hi Megan thanks for the thorough explanation I keep getting this error when it comes to creating the row in the Contact Point Consent :Exception ‘KeyNotFoundException’ occured: The given key was not present in the dictionary., CorrelationId: 8316c04d-72a1-4b9c-8d17-f77095b38a7e
I ve tried multiple versions of the flow and the result is the same, I am using the standard mobilephone as variable because we do not want to run validation and update codes.
Hi Stacy, hard to know without seeing that step and making sure you have everything needed. Sounds like something that is required is missing in your add a new row action. Feel free to message me via my Contact form page.
Good morning Megan,
Using customer voice and external sms messaging system, have you tried to do an unsubscribe on the sms that feeds back into D365 as unsubscribe record and from there we can turn off “allow sms” for contact?
Is there a way to render a url in sms that brings up unsubcribe which takes contact details? I see it can be done for email by default in Customer voice
Hi Una, this isn’t something that I have done before. When someone unsubscribes for email in Customer Voice, that is actually unsubscribing them from getting emails if you use the native email functionality within Customer Voice itself. It isn’t updating the Contact record from a GDPR or Opt Out perspective so you could still send them emails from D365 Marketing. As there is no OOB functionality for sending text messages from Customer Voice, you must be using a custom process. So the same would apply. You would need to manage your opt outs via another method such as a subscription center in D365 Marketing.
Hi Megan,
Another great blog. I will get through all of them eventually 😁.
With Realtime marketing is there an out-of-the-box way for contacts to opt out of receiving text messages?
Thanks,
Seán
Hi Seán, keep going! More blogs on the way 😉
You can use SMS keywords and if someone texts back the words OPT OUT for example, you can use that to update the Contact Point Consent record for that number. However, if someone opts out via the service you are using (Twilio, TeleSign etc.), that will not currently be passed back in to D365 from what I understand. The person won’t get any more text messages, but you won’t get that detail updated back in automatically. Seems like there might be a blog post idea there…. 🤔
Hi Megan,
Thanks again for your response.
I have added a keyword called STOP and sent that in the text message. Do I now need to create a power automate flow to change the contact’s consent record to ‘opted out’ when they reply with STOP.
Alternatively, when creating a new text message there is a notification that says ‘Remember to include a link to the preference center if the message has a commercial purpose’. The link to the preference center can be added to the text message via the personalisation button. On the preference centre page it defaults to the contact’s email consent record and they have to switch to their phone consent record in order to unsubscribe from texts. This is not very intuitive for the contact.
Thanks,
Seán
Hi Seán,
Actually, having looked at some of the documentation from Twilio, I think you might need to be a bit cleverer with the opt out word. What will happen otherwise is that if STOP is texted, it will stop Twilio from sending more text messages, but that information will not be sent back in to D365 Marketing. This means someone could unsubscribe from the Twilio service and won’t get your texts, but you won’t have information to know that so will be unable to run a flow to change the Contact Point Consent record if that makes sense.
https://support.twilio.com/hc/en-us/articles/223134027-Twilio-support-for-opt-out-keywords-SMS-STOP-filtering-