*** NOTE: ALL INFORMATION IS ACCURATE AT DATE OF PUBLISHING ***
Recently I was asked by someone how they could show some of the responses from a Forms Pro survey directly on a Case record. You can easily set a Survey Invitation regarding a case, and the corresponding Survey Response also comes back linked to the case. That’s simple to do (see here and here), but how can you display the NPS, Sentiment or even the value from a Rating question? Once a case is resolved, which is triggering the feedback request to be sent, you can’t then update the case later (without reopening it which can lead to issues and other challenges). What we can do is create a new related entity to store information and then display on the case instead. Let’s look at how we can display this on a case.
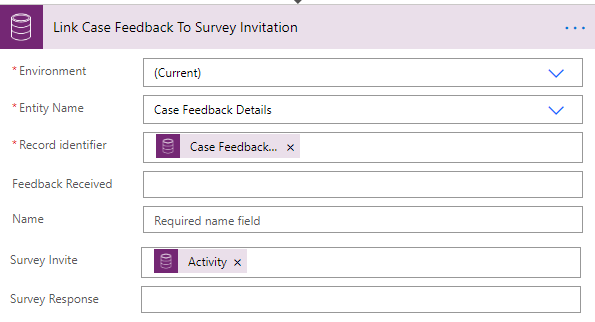
First, we will create a new solution and create an entity called Case Feedback Detail. If you are not sure how to create solutions, I’ve walked through this in a few other posts, here and here.
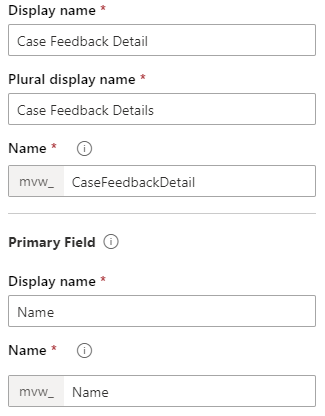
We then add some custom fields to the entity. Make sure you make the Name field Optional. It will be required by default as it’s the Primary Field, but we don’t need this to be the case as we are going to populate the value using Power Automate. In the list below, the Net Promoter Score, Sentiment and Rating are the three fields that I would say are optional, and dependent on what you want to show from the Survey Response.

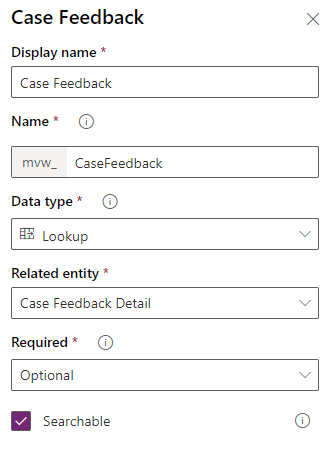
Next, add the Case entity to your solution, and create a new field that’s a lookup to the new Case Feedback Detail entity added in the steps above.
In your new entity you will have a Quick View Form created, edit this to show only the fields you wish to display on the Case entity form.
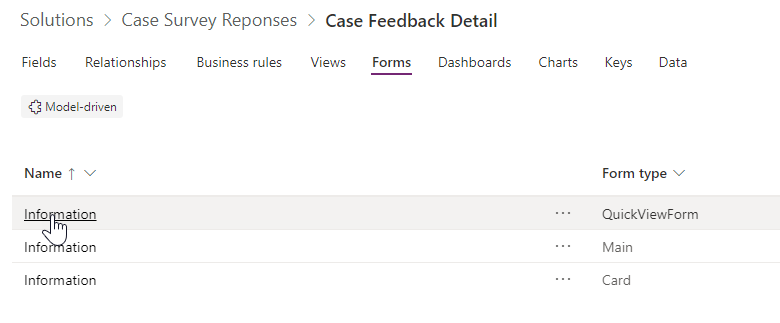
Then add the Quick View Form above on to the Case Main Form that you use. This will be based on the Case Feedback lookup field you added above.

Once all that is set up, add a new flow to your solution which will open Power Automate. This first flow will create a new Case Feedback Details record when a case is created. Our trigger is from the current CDS connector and will run when a case is created. The next step is a CDS action to create a new Case Feedback Details record. We will set the Name of the record to include the Case Number. Then the Related Case field will be populated using the name of the entity (incidents) and the case identifier to link it to the case from the trigger step.

Next we want to link the Case to the Case Feedback record by using the current CDS connector again, with an update record action. Get the case from the trigger step, and then using the name of the new entity you added, and then the id from your second action step above. That’s all we need to do for now. You might need another flow to run if you ever delete cases and want to remove the case feedback detail record too.

Now we need to create a second flow from the solution. This one will run when the case is resolved. I’ve covered this several times before, which you can read about here and here. I will pick up the flow from the point at which an invitation is created. Make sure your regarding is set linking it to the incident followed by a comma and then the case identifier from your original trigger step. I then have a schedule action which will wait for 10 seconds. I have seen this run and the invitation can’t be found if the next step runs immediately afterwards, so have found that the wait can help with that.

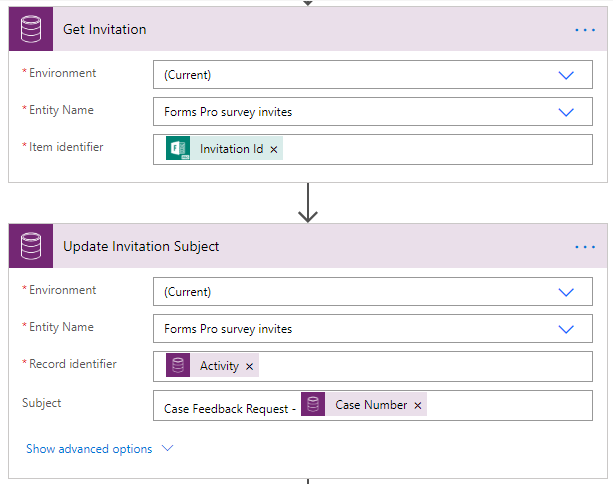
Now we get the invitation that was created above. I want to update the survey invitation and give it a nice logical subject rather than it being empty. Use the Activity id as the record identifier from the Get invitation action step. In this example I am using the Case Number as part of the subject.
Now I am going to get the Case Feedback Details record that was created in flow one when the case was originally created. So we have a get record step to find the correct records using the value that is on the Case.

Now we are going to link the Survey Invitation to the Case Feedback Details using the Activity ID value from the Survey Invitation that was created earlier in this second flow. Make sure you have your step that actually sends out the invitation to the Contact record.
Finally, we need to create a third flow from our solution file. This one will run when the survey response is received, and will then update the details on the Case Feedback Details record which we are then displaying within the related Case record. First our trigger uses the current CDS connector and runs when a survey response record is created. Then we use the Microsoft Forms (not Forms Pro) connector to get the response details. Use the following expression in the response id field.
int(triggerBody()?['msfp_sourceresponseidentifier'])

In this example, we are going to display the Sentiment of the survey response. The Sentiment value is the only thing that is passed back, so we need a compose step and then the following expression to convert the value in to something meaningful (use emojis or don’t ???? – that is your choice ????).
if(equals(triggerBody()?['msfp_sentiment'],647390002),'???? Negative',
if(equals(triggerBody()?['msfp_sentiment'],647390001),'???? Neutral',
'???? Positive'))

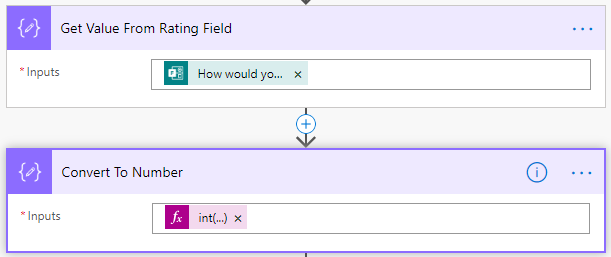
Next, we are going to get a value from a rating question. To do this, we first have a compose step to get the response from our rating question on the survey. Then we are going to take that value and convert it from text to an integer. Use the following expression in the Convert To Number step.
int(outputs('Get_Value_From_Rating_Field'))
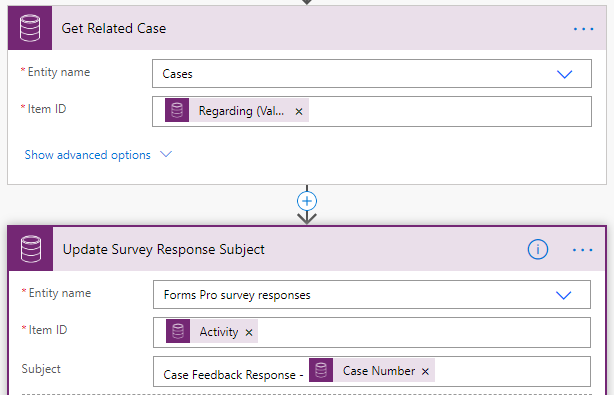
Next, we need to get the related case using the current CDS connector and then using the regarding value as the Item ID. We are then going to add an update record step to update the subject of the survey response that was received. This isn’t needed, but makes things look a WHOLE lot nicer with a relevant subject!
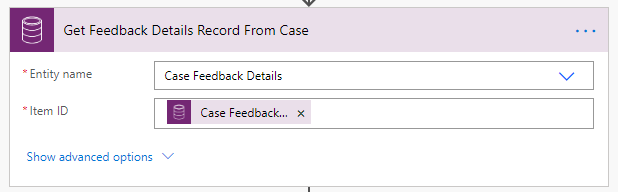
Now we are going to get the Case Feedback Details record that is linked to the case we pulled in the Get Related Case step above.
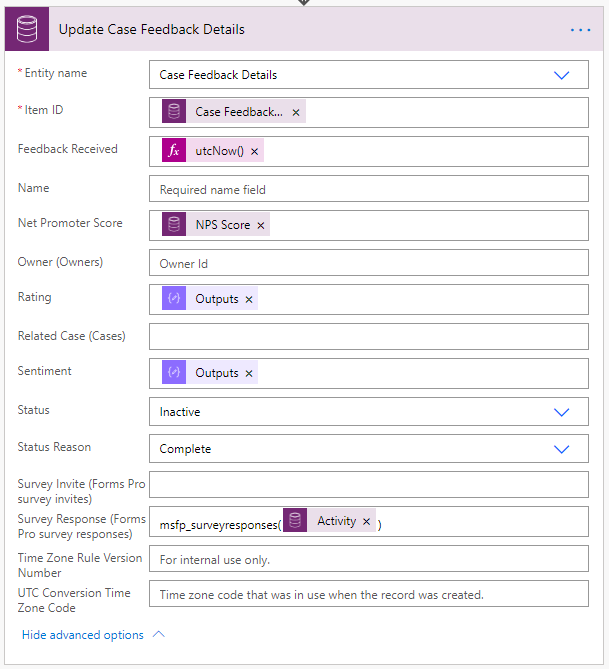
Finally, we are going to update the Case Feedback Details record we found above. Make sure to use the Output from the Rating compose step, and the Output from the Sentiment compose step, and link the survey response from the original trigger step (again, using the Activity id).
Now we can see some of the details from the Survey Response without having to open up and read through the entire survey. With the links we can still get to the full survey, but a quick glance gives us some of the top priority information we want to see.

Check out the latest post:
Use Custom Event Registration Questions To Branch Your Journeys In Customer Insights
This is just 1 of 603 articles. You can browse through all of them by going to the main blog page, or navigate through different categories to find more content you are interested in. You can also subscribe and get new blog posts emailed to you directly.